The Cal-look Lounge
Welcome, Guest. Please login or register.
Did you miss your activation email?
May 06, 2024, 01:40:19 am

Login with username, password and session length
Thank you for your support!
Search:     Advanced search
350707 Posts in 28580 Topics by 6823 Members
Latest Member: Riisager
* Home This Year's European Top 20 lists All Time European Top 20 lists Search Login Register
+  The Cal-look Lounge
|-+  Cal-look/High Performance
| |-+  In Da Werks
| | |-+  My '72 Beetle "Herbie" Race Car
« previous next »
Pages: [1] Print
Author Topic: My '72 Beetle "Herbie" Race Car  (Read 9902 times)
steve_pugh
Full Member
***
Posts: 151


WWW
« on: March 20, 2013, 11:43:43 am »

Hi.

Thought I'd start a post of my own.    I have one on VZi but as it's a race car now, figured this is the lounge to be in. :-)
 
Lots happening on the car at the moment but thought I'd tell it's story over the last few yrs.

2009.
Decided I had enough money for either a paintjob, OR an engine rebuild..
So I went for the Engine (Fast is better than looks) and so I spent the yr prepping the car and painting it with a cheap spray gun and some Celulose paint,  while Rob Judge of RNJ had my engine. 
A Type 4 1911.
Ported and Polished heads.
Web Cam 163.
Balanced Crank flywheel and pulleys. 
8.5/1 Cr and an ignition setting of 30* max advance @ 3000rpm.
Twin Webber 40s.
All this work and Rob's magic touch gives me #Bhp.  (I had no idea......  :? )

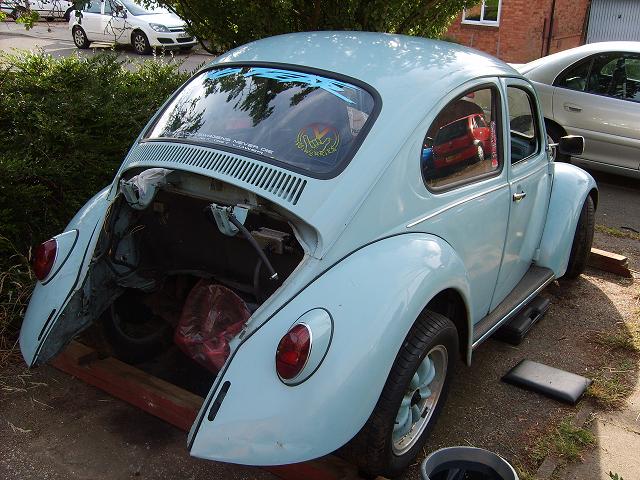
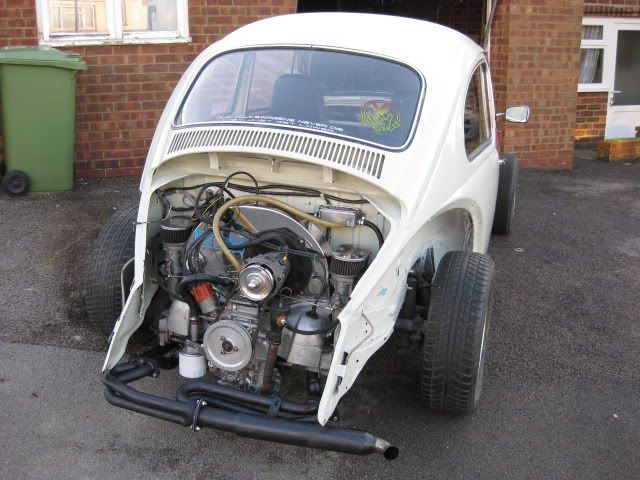
This was the car back in the summer of 2009.  I'd just taken the engine out and sent it to Rob at RNJ for it's full rebuild and tweaking.


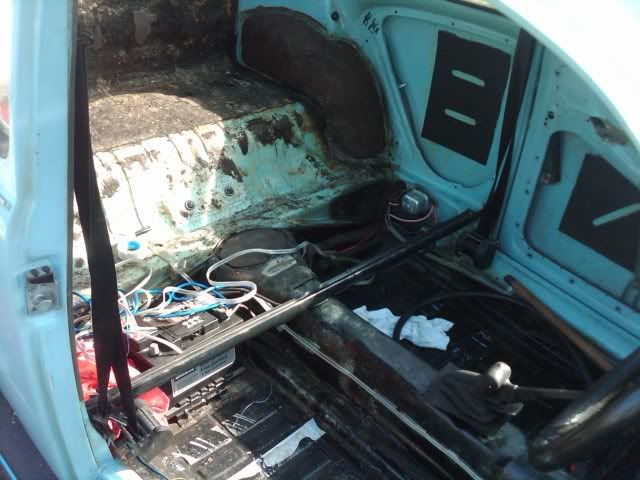
The interior all stripped for prepping.


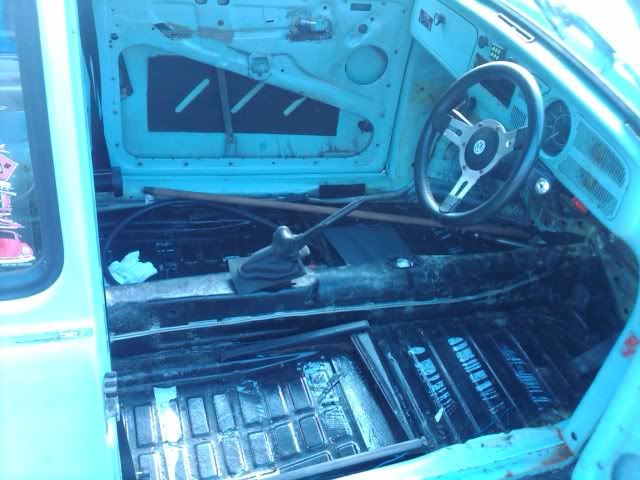
The interior painted.


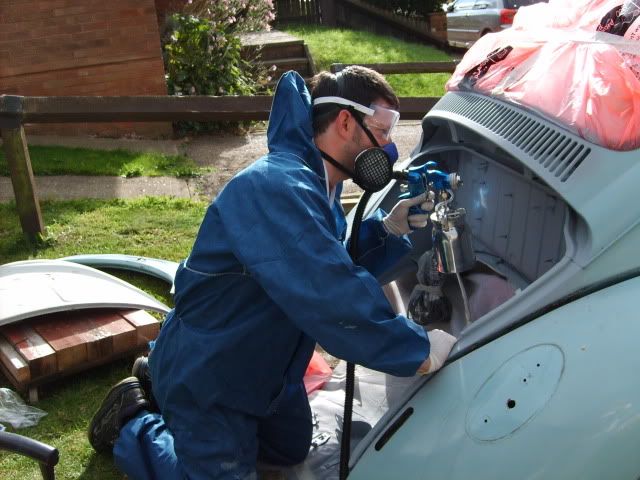
Me in my space suit painting the engine bay:


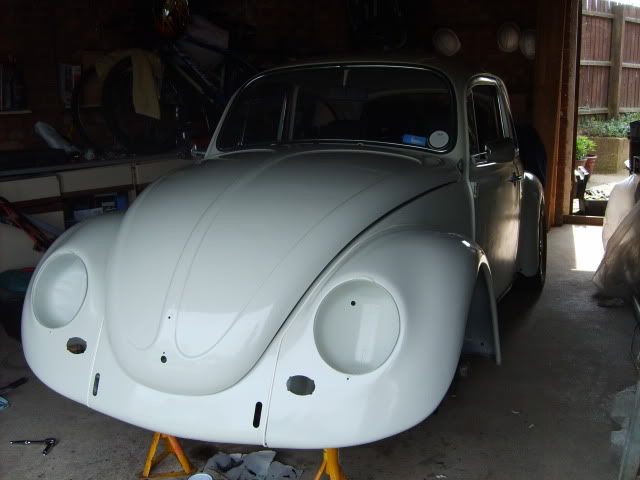
The outside all stripped for primer:


Into the "Special High-Tech Paint Booth"  (6m x 3m Party Gazebo...)


I have even floodlit my "paintbooth" and I was out there till late in the evenings, till about midnight flatting back primer ready for colour.


-------------------------------------------------------

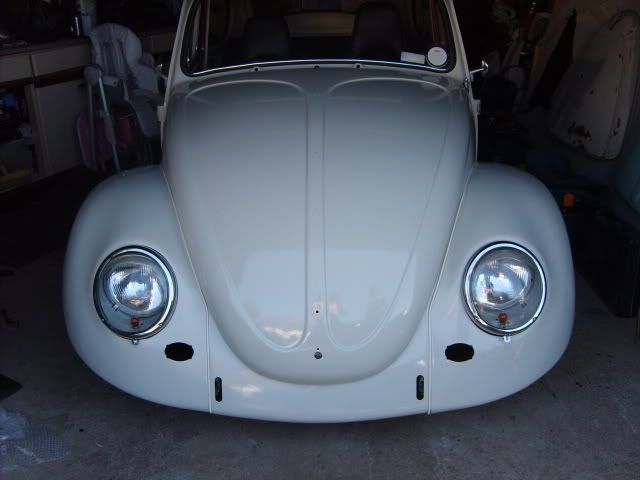
And the Top coat on:


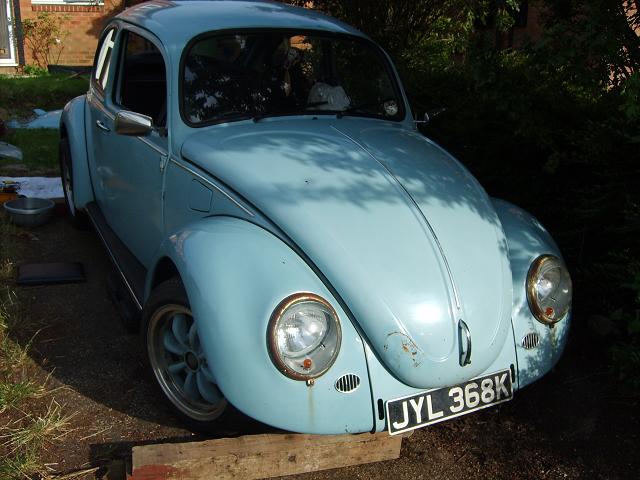
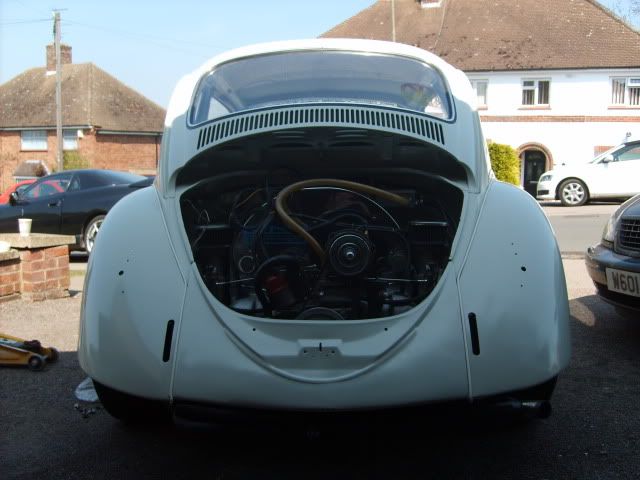
This was the car not long after getting my engine back from Rob and fitting it.


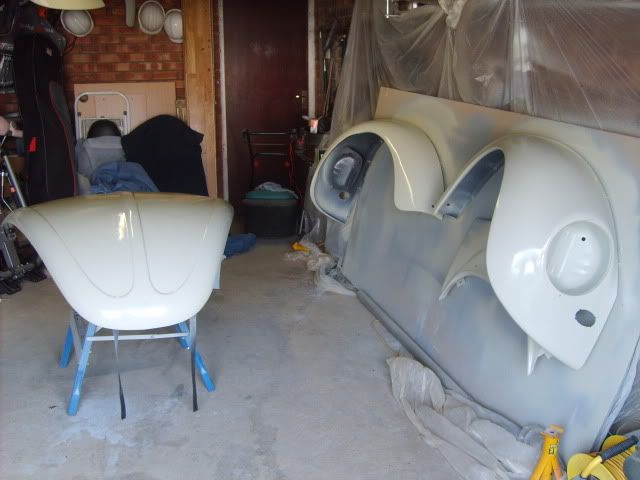
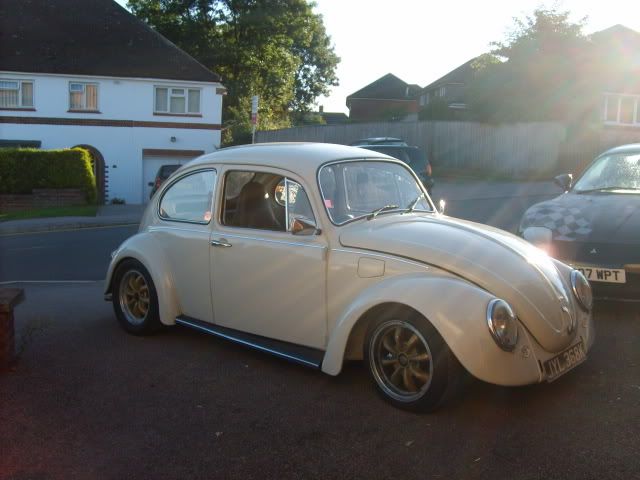
I since moved (nasty breakup...) and aquired a "Better Paintbooth" (A garage...) and got to work on the Wings and Bonnet, and the doors.


The finished article:


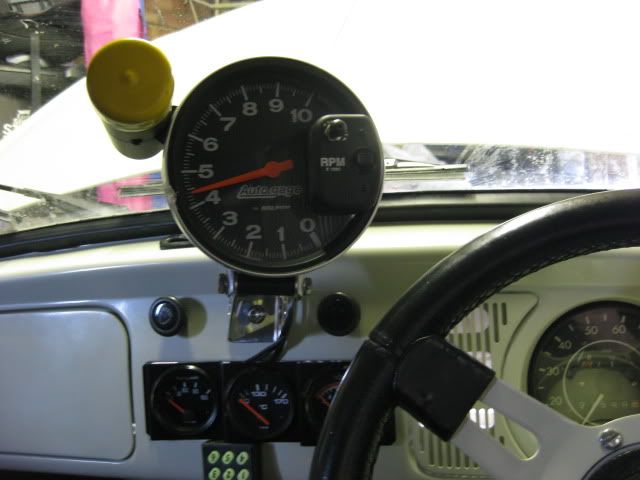
A brand new VW Speed Shop Tach Mount went in.  A Second hand Tacho with tiny dent (since removed and smothed out I'd like to add...) and some gauges to let me know what's happening.  Oil temp and pressure, and volts....


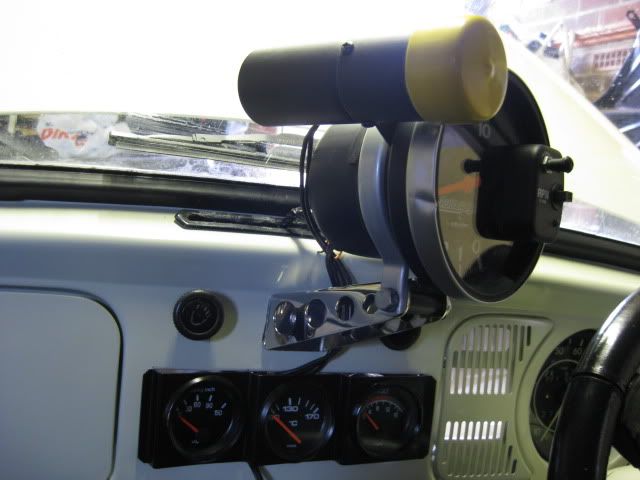
I had no idea what she would run on the 1/4 mile but a RWYB should give me some good runs to allow me to choose a good dial in time.  All in the very near future.
Logged

steve_pugh
Full Member
***
Posts: 151


WWW
« Reply #1 on: March 20, 2013, 11:46:05 am »

The exhaust developed a nasty hole...

So I upgraded it to a stainless backbox from L.A. Performance.


Then added the Decals:


Then it looked like this.


----------------------

Did a few rwyb over the yr of 2010 and 2011 putting in 17.8 ish times.
and then signing up to the VWDRC for a full season in 2012.   
However, a month or so before Easter Thunderball. the gearbox decided to give out.

So 2 weeks before the start to the season and the first race of my life, I'm faced with this :eek::


But I got it back in and with some help from my little mechanic.... We get the engine back in and running!


------------

Full Season of VWDRC.  Starting the season with 18s and finishing with a PB of 16.02 after some clever Jetting, I'm well and truly Hooked and looking forward to 2013.


Got married too and Herbie took us to the wedding.


But 2 yrs of dodgy Home Brew Cellulose outdoor sprayed Paint and stickers were looking more than tired and worse for wear.    So the season ended and the real work has begun.

WOW. We are finally up to date!!!      (is anyone still reading? )
Logged

steve_pugh
Full Member
***
Posts: 151


WWW
« Reply #2 on: March 20, 2013, 11:48:39 am »

Ok.  2012/early 2013.   

Plans were to:
IRS.
Fibreglass wings, decklid, bonnet.
Conversion to long early bonnet. 
Full paint and resto.

Kudos will be going to:
Rich Jones and Mabbo at Retroperformance.
Bruce Collins at WRP Paint and Restoration
Andy Sykes of Crazy Oval turbo fame and Syked out Vw.
Rob Kilham at East Coast Manx/buggies for the Fibreglass front wings, bonnet and Decklid

So the strip down begins.
The wings, bonnet, decklid, all glass (Bar the windscreen) won't be going back on...


Next step, Body off.    Off to retroperformance for IRS then back to WRP.

Time is ticking....

Ok.  So the IRS begins...

The stripped body arrives at Retro Performance.   


A previous welding session had welded this corner of the body to the Chassis so it needed some gentle "Persuasion" to come apart.  But come apart it Did.  :-)


However, we then came accross some Unfortunate issues.....   We knew that it wasn't looking good when the bolts under the framehead just spun and made crunchy noises, but we weren't prepared for the extent...     Also the right hand heater channel was literally splitting apart!!!   


Also the framehead bottom was... Well... Missing... 


So we have some full replacement Heater Channels, the front panel bulkhead bottom half, the framehead bottom and a few other assorted panels.      But hopefully then the car will be a little more solid!

Work continues and good progress has been made to the IRS also.   Herbie sits in the corner for now with his new Gearbox, Midmount fitted and waiting to go in...


IRS work. 


These still need clearancing....


IRS BOX!!!


IRS.  :-D


PARTS!  :-)


Logged

steve_pugh
Full Member
***
Posts: 151


WWW
« Reply #3 on: March 20, 2013, 11:50:31 am »

Framehead work.


Chassis all painted in Epoxy Mastic.


Passenger Heater Channel on and door test fitted for fit before final welding.


All bolted back together and arriving At WRP..


Test fit of a Long bonnet whilst my fibreglass one is being made.   (Still at Bruce's at this point)


The valance welded on with the bumper slots welded shut.


Lining up a scary as hell cut....


Then it gets cut!


But it's ok it goes back on.   :-)


But with a removeable rear end it means I can no longer use my Berg Traction Bar so I needed something else to stop the wheel tramp and to protect the framehorns (especially as they are weaker due to clearancing from the IRS conversion )
So...  This was the solution:


Fuel filler flap also being welded shut and my fuel tank is being modified to fill under the bonnet.


Logged

steve_pugh
Full Member
***
Posts: 151


WWW
« Reply #4 on: March 20, 2013, 11:55:17 am »

Small update.


 We have blasted the wheel arches, vents and under bonnet, bare metal has 2k epoxy on it then 4 coats of 2k high build all over.

----------------------------

Went down to WRP Sunday night to sand the interior of the car as we have decided to paint in there too.  Originally we were just gonna do an outside paintjob but as it was all apart and at this stage, we figured what the heck.
I'd forgotten how insanely annoying it is sanding under the dash with all it's undulations and trying to do it upside down, sideways, etc.   My back hurt in the morning....


Also on Sunday afternoon (on my way back from buying another car...) I picked up my new Fibreglass Long Bonnet from Rob Kilham at East Coast Buggies and couldn't wait to test fit it.   Cheesy  (Also propped on my Day Mouldings front wings to complete the look. )

It fits like an absolute glove!   Honestly when it's painted, you won't be able to tell it's not a genuine original Bonnet.   The work done By Rob Kilham is outstanding. :eek: 
It has a fibreglass hinge panel.   Even tho it's not raceweight, it still weighs a fair chunk less than a standard <67 bonnet.   And at half the price of a decent solid original.


Bruce has also drilled out the trim mounting holes as I have decided to go for Wide Trim.   In Stainless!    Cool
Logged

steve_pugh
Full Member
***
Posts: 151


WWW
« Reply #5 on: March 20, 2013, 11:57:43 am »

Inside has now got a nice shiney new coat of Paint!!! Very excited.  :-)

Quote from: Dead Dog


Smiley

Logged

VWGlassee
Full Member
***
Posts: 223


« Reply #6 on: March 20, 2013, 15:35:52 pm »

Nice project!
All it needs now is a ragtop  Grin
Logged

Get In, Sit Down, Shut Up, & Hold On
steve_pugh
Full Member
***
Posts: 151


WWW
« Reply #7 on: March 20, 2013, 15:45:15 pm »

Nice project!
All it needs now is a ragtop  Grin

Thanks.  Cool
I thought about it... But if I cut a sunroof in then it's cage time...  And I'm not quite ready for a cage.. HOWEVER... When I do need one (And I will..) then I will do it.   If not only to offset the weight of the cage against losing over 60% of the roof!   Grin
Logged

andy198712
Hero Member
*****
Posts: 1063


« Reply #8 on: March 21, 2013, 13:55:15 pm »

this is great!! nice work going in there! i'm expecting similar from my 72... Sad

will have a great car by the end of it!
Logged
Jonny Grigg
Full Member
***
Posts: 232


« Reply #9 on: March 22, 2013, 08:49:55 am »

Lots of good work here.... Well done!

Looks like a typical 70s rotter. Mine was the same......
Logged

No Compromise. O/FF111
Chris bugster
Full Member
***
Posts: 184


« Reply #10 on: March 22, 2013, 16:42:13 pm »

It's so nice to see that your Bug is a family interest thing and that it covers a multitude of sins. Your boy can play at being a mechanic, you got married in it and you get to drive it on the street and race it.
Logged

11.2@124mph
steve_pugh
Full Member
***
Posts: 151


WWW
« Reply #11 on: March 23, 2013, 11:30:52 am »

It's so nice to see that your Bug is a family interest thing and that it covers a multitude of sins. Your boy can play at being a mechanic, you got married in it and you get to drive it on the street and race it.

Yeah it's pretty cool. Plenty of family history and stories.   
I had it since I was 17 too. 
Logged

steve_pugh
Full Member
***
Posts: 151


WWW
« Reply #12 on: August 06, 2013, 08:43:41 am »

Quote from: Dead Dog


Finally a bit more done.
Bonnet is from Rob the manx, from what I've seen of his work so far it really is the nuts, his bonnet just got the same treatment as the day wings steve got - a block prior to high build - NO filler at all - top stuff  Cheesy

Can't wait to get our wings from him!

Nice work as always bruce. 
The work by rob is just outstanding. And we all know how good Day mouldings are..

If anyone needed any replacement fibreglass I'd reccomend rob in a heartbeat. Bruce has had 2 other Fibreglass early bonnets in his workshop and both are shoddy by a long way in comparison.

It just accentuates Bruce's also outstanding work.

Looking forward to getting a Decklid and rear wings to complete the package. I cannot wait to see it all panted and looking shiney. Cheesy:D


Long time without an update.
After some messing about with doors, we used one import door, and one original door, the original was bare metal'd epoxy'd, then filled then 2k HB, along with repairing and priming the import and rear valance.


------------------------

Colour!


Then came the door numbering. 
Painted the centre black.  applied the decal and peeled away the white section.  Sprayed this white, then masked up the Gumball and sprayed the door body colour.   Very clever.   Tho' lining up the stickers and stuff just sent Bruce a little crazy!


Look how insanely straight it is. :-)


Bonnet number time.. This was harder than the doors as bruce couldn't just blat some black on the centre in the same way as the doors.
We had to line up the waste part of the decal and make sure it was a perfect circle.  Then paint a black circle, and then line up the decal EXACTLY inside that.. Few hairs lost on that one.

Cutting the Decal.


Old Bonnet and new one for reference of placement.


Done. :-)


Logged

steve_pugh
Full Member
***
Posts: 151


WWW
« Reply #13 on: August 06, 2013, 10:45:17 am »

Bolted up the rear wings, fresh from the Fibreglasser.
The stock holes made the wings sit a little low.    Elongated them by a fair bit and got them to line up.

Before:


After:


Fitted the Dzus Tabs.


Fitting the Beak Light.


Bringing it home for the first time in a long while!


Logged

steve_pugh
Full Member
***
Posts: 151


WWW
« Reply #14 on: August 06, 2013, 11:40:15 am »

The Rear sections still stayed at WRP for paint and decals while we got the car ready to take to Bug jam.  It was gonna be a tight deadline!


Hard Fuel Line through the car was something that needed to change for a long time and is against regulations for racing anyway so this had to go…

It was all upgraded to 8MM Cupro-Nickel, including replacing the Fuel Tank elbow for an 8MM one.
Ran it down the side of the car just above the body bolts and secured tightly with P-Clips then brand new rubber hose for the fuel pump. 


Logged

Pages: [1] Print 
« previous next »
Jump to:  

Powered by MySQL Powered by PHP Powered by SMF 1.1.21 | SMF © 2015, Simple Machines Valid XHTML 1.0! Valid CSS!