The Cal-look Lounge
Welcome, Guest. Please login or register.
Did you miss your activation email?
May 02, 2024, 11:50:49 am

Login with username, password and session length
Thank you for your support!
Search:     Advanced search
350698 Posts in 28579 Topics by 6823 Members
Latest Member: Riisager
* Home This Year's European Top 20 lists All Time European Top 20 lists Search Login Register
+  The Cal-look Lounge
|-+  Cal-look/High Performance
| |-+  In Da Werks
| | |-+  Fubar 64
« previous next »
Pages: 1 2 [3] 4 5 ... 13 Print
Author Topic: Fubar 64  (Read 168973 times)
vwhelmot
Hero Member
*****
Posts: 687


« Reply #60 on: June 18, 2015, 08:51:43 am »

Cheers for the compliments!  The key is to enjoy what you are doing, the moment you start to get pissed off , just walk away!    So far I`ve really enjoyed it. The body is 90% done.  

The right rear wheel arch was a mess. I had repaired it previously with one of vengs finest panels and I knew that the only way to fix that was to try and get a genuine body cut. I eventually managed to get some cuts from the states but it took a long time. I was out of action for months on the rear corner so I did some other metal repairs on other sections of the car. I will post up those bits later.   Now when I got the box full of vw tin, I was happy and a bit disappointed too as the vendor failed to understand that I wanted all the flanges complete. Drilling spot welds did not happen, instead they were cut using an air chisel. Now the only bonus of that is that there is no lost metal as it wasn't cut using a grinder.

Rusty shit  Grin


I was gutted to see that the flange had been cut on the boot floor  Embarrassed


Both the flanges were still attached to the rear arch though.


« Last Edit: June 18, 2015, 09:01:43 am by vwhelmot » Logged
vwhelmot
Hero Member
*****
Posts: 687


« Reply #61 on: June 18, 2015, 09:34:44 am »

It would have been rude not to use the an original flange  Grin


Welded, smoothed and modified to look like the other side


Logged
vwhelmot
Hero Member
*****
Posts: 687


« Reply #62 on: June 18, 2015, 12:05:37 pm »

Fortunately the bottom flange was intact


I decided to remove the whole section.


Nice!


If in doubt!


I blasted it and protected it before tacking it in.


Fit was nice


Made a new overlap


Logged
vwhelmot
Hero Member
*****
Posts: 687


« Reply #63 on: June 18, 2015, 12:09:24 pm »

Next was to cut a huge hole out.  :shock:  Updates soon.
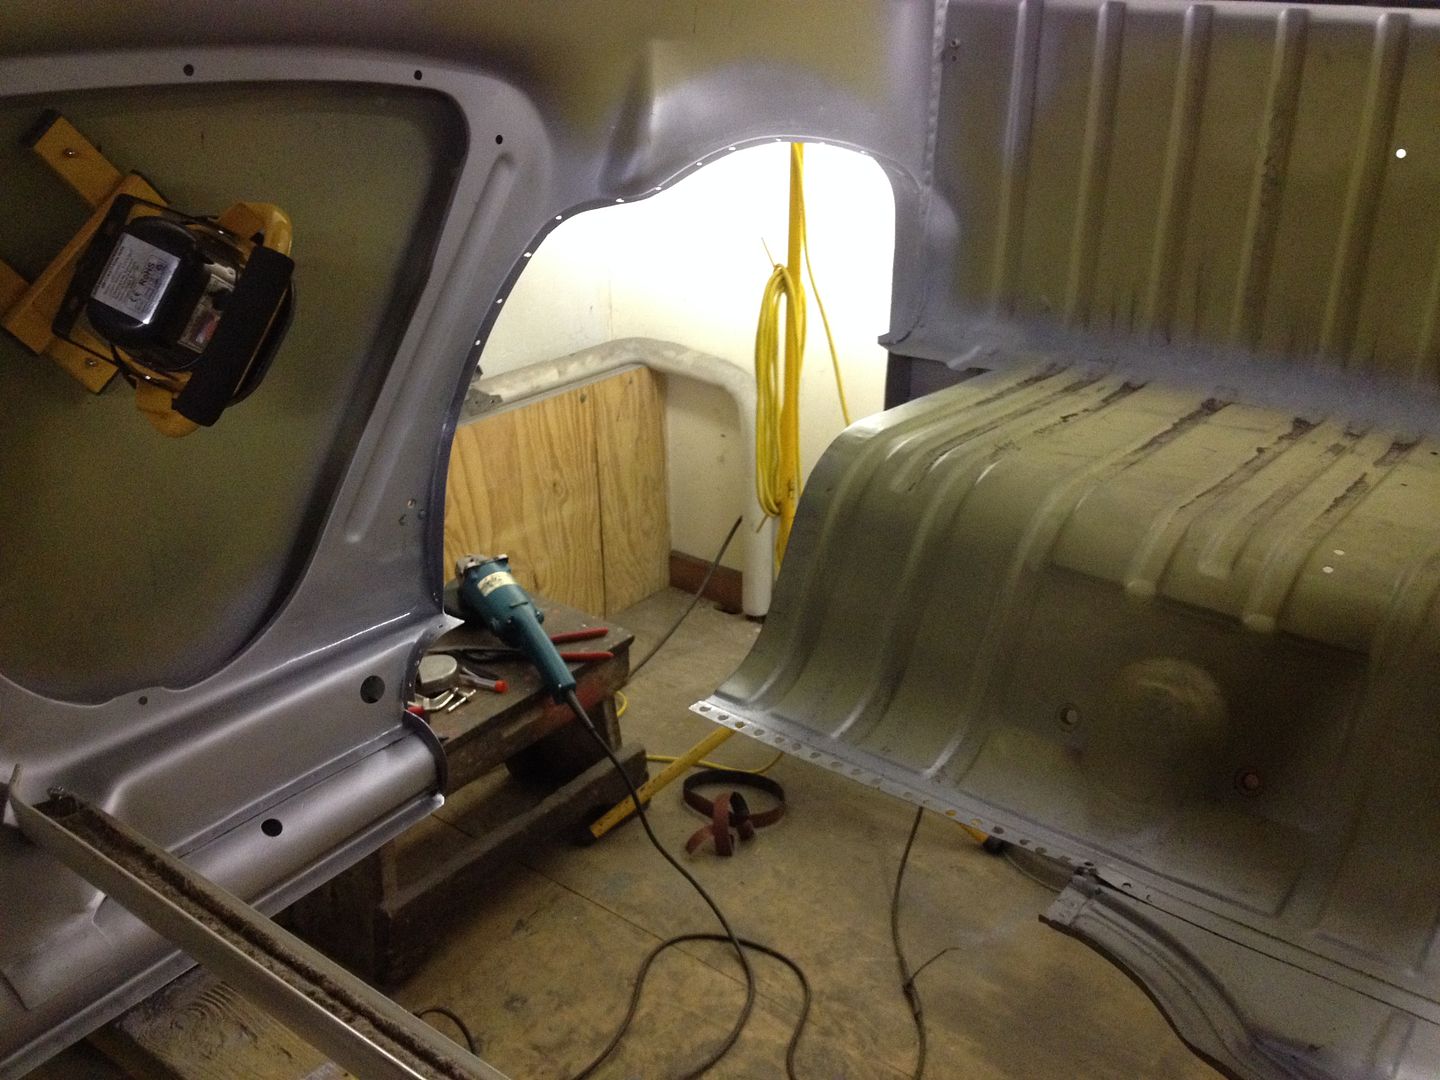
Logged
Jeff68
Sr. Member
****
Posts: 394


« Reply #64 on: June 18, 2015, 13:59:49 pm »

Very nice work to say the least....You're a dedicated hard working VW guy for sure! Keep going! Cool
Logged
vwhelmot
Hero Member
*****
Posts: 687


« Reply #65 on: June 20, 2015, 12:42:56 pm »

So next I had to think about the best way of welding the flange back on to the boot floor. I ended up lining up the two panels and tacking them together to get the fitment right and then drill the spot welds out to separate them.


Separated, Why this wasn't done in the first place I will never know!


Blasted and the dents knocked out


The back of the boot floor had a tiny bit of rust under the seam sealer and as you know any rust is no good.


Offered up. Fitted nice.


Welding up the flange from the back


If you get decent penetration its sometimes easier to smooth the weld this way, but its thin metal and mistakes can be made. This takes hours.


Almost done


Trial fitting again.


Tacked in place but there was a problem


Lack of a gap as the welds had pulled it in.


I had to run a 1mm cutting disc through the line to create a gap.


No filler or bog


Layer of weld through primer to protect the metal for now


Underneath was fun


Slowly getting there


Next will be the rear arch. Happy days.


Logged
vwhelmot
Hero Member
*****
Posts: 687


« Reply #66 on: June 21, 2015, 16:47:10 pm »


Body went back on the pan so I could weld in the rear cross member.


Plugged in


Smoothed the plugs underneath


The rear arch arrived with a section missing so I had to fab up a replacement. I guessed how big the piece had to be for now as I wouldn't be able to get an accurate length until I tacked the whole arch in place first. Drilled out the spot too


The wing nutserts were wrong too


Fabricated a new section.


First trial fitting and it didn't look good. The bitch wasn't playing ball!


It took ages to fettle it into position.


Notice the rear and the gap even though it was hard up against the boot floor in sections


Getting there. Notice assortment of wing captive nutserts! This I would have to fix before welding the arch in.

[IMG]http://i98.photobucket.com/albums/l242/vwhelmot/Fubar64/7AAAF113-
Logged
vwhelmot
Hero Member
*****
Posts: 687


« Reply #67 on: June 21, 2015, 17:08:10 pm »

To get the recess for the nutsert I made a press tool. I had sections of a front quarter to experiment with to get the size and shape right. First attempt the corners were too sharp so after I adjusted the tool it worked fine.


First attempt was wrong


Second try


I was worried about panel distortion but that turned out to be minimal.


Inside


This is a front quarter nutsert. I would silver solder the genuine nutserts in place. Silver solder has a low melting point and flows lovely so the weld would be invisible.  Now , I only had available enough genuine nuts to do the whole front of the car. The N/S front quarter needed the lot changing so for the rear I made my own.

You can just about see the weld between the nut and the surrounding metal


So for the rear it wasn't important what the nutsert looked like from the back as they are all hidden. I bought some square weld nuts and modified them on the lathe.


Experimented a few times but they turned out ok


Welded one in, took ages as I didn't want to damage the rear quarter with heat


Logged
vwhelmot
Hero Member
*****
Posts: 687


« Reply #68 on: June 22, 2015, 09:43:57 am »


Next I could finish the lower section of the arch now I could gauge the length of the panel. An overlap was left to form a lip after.


I smoothed this weld up for an invisible repair


Every hole was welded up and smoothed


Fitted up


Tacked in


Checking levels


fat fingers


« Last Edit: June 22, 2015, 10:50:57 am by vwhelmot » Logged
vwhelmot
Hero Member
*****
Posts: 687


« Reply #69 on: June 23, 2015, 08:36:43 am »

Once I had tacked the arch in, I made a new inner lip.


 I needed to check fitment with the pan and for that I needed the outer support panel in place. As that had been cut too, I needed to replace the lower part so I used the left over veng section as a donor panel.
  See the size difference from genuine to pattern. It was quite a bit different. Not much of it lined up.


Getting into shape


After a load of work I had this


Created a new lip from scratch


Fitting up


On the pan  Grin


Starting to weld the arch in


Hours and hours into this bitch!


Logged
vwhelmot
Hero Member
*****
Posts: 687


« Reply #70 on: June 23, 2015, 10:47:08 am »


Getting a nice finish on both sides takes all the time.


No filler


Getting there


Logged
vwhelmot
Hero Member
*****
Posts: 687


« Reply #71 on: June 23, 2015, 12:09:20 pm »

Finishing off in a few areas. Made a new closing piece, which isn't exactly the same as factory but I like it anyway as it flows better.


Load of plug welding and finishing needed.


Logged
vwhelmot
Hero Member
*****
Posts: 687


« Reply #72 on: June 23, 2015, 12:26:02 pm »

Before and after  Cheesy


Money shot

Logged
jick
Hero Member
*****
Posts: 1252


« Reply #73 on: June 23, 2015, 12:30:51 pm »

amazing stuff dude!   
Logged

Neil Davies
Hero Member
*****
Posts: 3437


« Reply #74 on: June 23, 2015, 20:17:19 pm »

Nice work! Be a shame to cover it in carpet... Wink seriously tho, it shows how far standards have risen in the last 10 years or so. Beetles arent the cheap disposable cars they were. I hope the aftermarket realises that and produces some better repair panels. We've got Hooky and Autocraft, Wolf and Gerson for the early stuff, but I'd like to see companies like Veng and Klokkerholm just looking after their tools to produce decent quality panels in reasonable thickness steel. Anyway,  rant over! Please continue with putting my repairs to shame! Grin
Logged

2007cc, 48IDFs, street car. 14.45@93 on pump fuel, treads, muffler and fanbelt. October 2017!
vwhelmot
Hero Member
*****
Posts: 687


« Reply #75 on: June 23, 2015, 20:49:41 pm »

I totally agree mate. I've found since starting the rebuild that there is a lack of decent repair panels for sixties bugs. There seems to be more available for earlier cars, even splits. I suppose it's a demand thing, maybe now as people are repairing sixties bugs to a nice standard the panel companies may take note and start offering correct pressings that not only fit but look right too. Easier said than done I suppose. I'm glad companies like hookys and virtanen , wolf and autocraft are about. I've tried to tell Steve Hook to look into cross members and boot floor edges as these are common rust areas.
PS, no carpet is covering my repairs , not even the front. Wink
Logged
vwhelmot
Hero Member
*****
Posts: 687


« Reply #76 on: June 24, 2015, 11:25:54 am »

Back to finishing the arch. Welded the support panel back on. Plenty of weld through between.


Logged
vwhelmot
Hero Member
*****
Posts: 687


« Reply #77 on: June 24, 2015, 11:50:49 am »

The next section to get attention was the rear scuttle. I knew it was crusty from the last time so the only way forward was to cut it out and start over. Its a really tricky area to restore as access is limited to smooth the welds. Anyway here goes.

All is not well


Highlighting the spot welds for drilling


The inside wasn't pretty


Prob loads of show cars out there with rust here


I tried to clean the lip but it was very thin


Nasty


Cut out the old and made a new one.


Blasted the edges


Kept the dimples


Trimming it down


Done


Logged
vwhelmot
Hero Member
*****
Posts: 687


« Reply #78 on: June 24, 2015, 13:29:29 pm »

Finding a donor section wasn't too hard as there was one on egay.  There will always be a part of the Smooth Ass Lowrider in my bug.  Grin


Chopped it up


I blasted it and straightened it.


Trial fitted


After a lot of fettling it fitted nice


Logged
vwhelmot
Hero Member
*****
Posts: 687


« Reply #79 on: June 25, 2015, 14:29:27 pm »

So while the scuttle was off I tackled this area. I converted it to standard style.


Smoother and neater


Other side. These areas were really tricky to clean the weld, really awkward job and getting my pinky stuck in the sander didn't help. Nice 45 degree chamfer though. Bit of insulation tape and carry on  Cheesy


Logged
vwhelmot
Hero Member
*****
Posts: 687


« Reply #80 on: June 26, 2015, 14:56:12 pm »

Back onto the scuttle, before tacking it in I fitted the hinge mount panel just to make sure that it was in the right place.


Deck lid fitted ok.


Gap still needs adjusting


As the deck lid mount panel is still going to be a bolt on affair, I wanted it to look clean from the inside so instead of welding m6 nuts on the inside like last time I got some Henk nuts and pressed them on with my hydraulic press.


Neater


Tack time


Getting to the inside to smooth the weld was a bitch.


Logged
vwhelmot
Hero Member
*****
Posts: 687


« Reply #81 on: June 26, 2015, 15:03:18 pm »

Edge needed building up.


While I was there I tidied this bit


Other side


Welded and tidied up the seam too


Hinge mount tidied up.


Logged
vwhelmot
Hero Member
*****
Posts: 687


« Reply #82 on: June 26, 2015, 15:12:06 pm »


Done

Logged
karl h
Hero Member
*****
Posts: 927


« Reply #83 on: June 26, 2015, 17:50:47 pm »

so you are trying to impress us, huh? you know what - it works! Grin
i did most of these areas a couple of times and it didnt remotley look as clean - stellar work, bud
Logged

Iryanu
Full Member
***
Posts: 188


« Reply #84 on: June 26, 2015, 23:40:53 pm »

This thread is off the hook. Shocked Kudos.
Logged
vwhelmot
Hero Member
*****
Posts: 687


« Reply #85 on: June 27, 2015, 08:43:10 am »

Thanks for the comments.

Remember the crusty egay rear valence?   Well I thought about using it instead of my NOS one as I still want to convert it into a quick release panel and the thought of cutting up a genuine new one fills me with dread. I`m going down a different route with this and I`m going to try and make it release in two sections.


I blasted it first to see how bad it was . It was bent and twisted but not too badly pitted.


Edge had disappeared


Made a new one


old new and new old  Grin


The inner panel was removed and modified with a few choice dimple holes. I had to rebuild the corners too.


I`ve still got to finish and figure out how I`m going to do this but I will make some quick release mounts so that the inner panel can be removed separately as not to scratch paint or have the fixings showing from the outside.


Logged
vwhelmot
Hero Member
*****
Posts: 687


« Reply #86 on: June 27, 2015, 09:26:06 am »


[/URL
Logged
vwhelmot
Hero Member
*****
Posts: 687


« Reply #87 on: June 27, 2015, 09:31:15 am »

One of the previous owners had fitted aluminium panels so I had to get rid of the nutserts and weld up the holes.


Logged
vwhelmot
Hero Member
*****
Posts: 687


« Reply #88 on: June 27, 2015, 09:39:07 am »

Going back to the N/S rear wheel arch , where I had replaced the rear quarter panel previously , the original square nutserts had gone so I had to replicate them. Again this took hours and hours as I didn't want to warp the quarter panel with heat.
 Before


Made a new section.


Patented super tool


Another one


And another


No filler required

Logged
vwhelmot
Hero Member
*****
Posts: 687


« Reply #89 on: June 29, 2015, 21:18:17 pm »

Next I had to tackle the channels. As I had replaced them all those years ago I knew they were rot free but the wrong shape so I had to convert them to the early smooth style. Some of you may question why I did this and not just put in a pair of gerson ones but I had fitted these old ones correctly, the doors fitted nice so to me it was easier to modify these plus I'm getting rid of the heater vents at the front too so I would have had to modify the gerson ones too. I also had to get rid of the harness mounts I had welded to them too.


I had to cut a section out and replace it as I had indented this area for the harness mount.


Big section to cut out


Logged
Pages: 1 2 [3] 4 5 ... 13 Print 
« previous next »
Jump to:  

Powered by MySQL Powered by PHP Powered by SMF 1.1.21 | SMF © 2015, Simple Machines Valid XHTML 1.0! Valid CSS!