The Cal-look Lounge
Welcome, Guest. Please login or register.
Did you miss your activation email?
April 20, 2024, 11:39:02 am

Login with username, password and session length
Thank you for your support!
Search:     Advanced search
350681 Posts in 28573 Topics by 6820 Members
Latest Member: chicochemxli
* Home This Year's European Top 20 lists All Time European Top 20 lists Search Login Register
+  The Cal-look Lounge
|-+  Cal-look/High Performance
| |-+  In Da Werks
| | |-+  My 67 notch expands to 2.2 liter (+beefed up gearbox)
« previous next »
Pages: 1 [2] 3 4 Print
Author Topic: My 67 notch expands to 2.2 liter (+beefed up gearbox)  (Read 64039 times)
Type1/DVK
Sr. Member
****
Posts: 315


« Reply #30 on: April 19, 2010, 23:14:43 pm »

Nice project Felix, i like it very much that you spend alot of time on all those details! did you also spend some time on ''boattailing'' the case on the inside? (making the passage between cilinders bigger)? I've build some engines with the new vw cases, and they are very rough on casting finish, i've also spotted that sealing problem on some cilinders base, helicoils not deep enough etc.

The blue colour maybe the residue of the honing process?? i have no clue.. That VHT stuff looks great, it's on a powder base i think?

Also a good tip for head/cilinder sealing is to use valve paste and put some in the head edge and twist the barrel in the cilinder head, this gives better sealing surface.

Good job and keep the pictures roll''n

Grt and see you @ DFL402
Logged

DDD#8 - 14.74sec @ 1776cc - Member of:  DVK ~ Der Vollgas Kreuzers  - www.ultimatevw.nl - and racing engines
Rasser
Sr. Member
****
Posts: 488


« Reply #31 on: April 20, 2010, 06:53:18 am »

Isn´t the cylinders seated right on the bottom heating element in the oven?  This part gets hotter than the 280 degrees you set the oven at, and the cylinders suck all the heat. If I were to ever put the cylinders in the oven, then I would put them in the middle, because the heat is better controlled here. Maybe they did get to hot?  Undecided
Logged

For a good time, call:    1-800-Cal-look
1955 type1
1966 type2 13w deluxe
red baron
Full Member
***
Posts: 133


WWW
« Reply #32 on: April 22, 2010, 18:29:51 pm »

Thank ya Max! Und echt lässige Bedalatschen  Grin

Ahhhh..okay now u owned me!

wow felix, this thing is going together really fast. I'd love to be as far as u with my build. But it'll take some time. Maybe DDD 2010. Studying sucks - no time/no money.
Logged

Felix/DFL
Sr. Member
****
Posts: 386


WWW
« Reply #33 on: May 08, 2010, 23:17:55 pm »

Isn´t the cylinders seated right on the bottom heating element in the oven?  This part gets hotter than the 280 degrees you set the oven at, and the cylinders suck all the heat. If I were to ever put the cylinders in the oven, then I would put them in the middle, because the heat is better controlled here. Maybe they did get to hot?  Undecided

Hi Rasser,
thank`s for your thoughts and you should be right with the bottom of the oven. Next time in the middle...I hope piston ring break in will not last much longer than normal as the cylinder wall will be harder now.

i may be all wet here, but doesn't the oil at the cooler galley need a way to flow from one to the other or did you address that while the case was apart?  i'd hate to see your engine oil starved!!!

Thank ya mate.
I even thouht about this problem.When closed completly an amount of air will rest up there taht`s for sure. That will effect the pressure readings at the orig. terminal but will be bad for the engine? I don`t know...
But I will look if I could tap the oil cooler itself and drill a small passage hole in the case to let a small amount of oil flow.

Sadly I haven`t got much time in the last weeks to do many things on the engine/car. Just small things.
Some mounting Hardware:


Modified the header to a big flange and needed to shorten the merged section to get it fit.


The other Glaspack will make the set up symetric in the next days:
Logged
Carsten
Full Member
***
Posts: 141


« Reply #34 on: May 10, 2010, 08:10:16 am »

:-)
This kind of exhaust may be...somehow...a little loud !?
Would be interesting to hear !
Greets , Carsten
Logged

1969 IRS bug
Felix/DFL
Sr. Member
****
Posts: 386


WWW
« Reply #35 on: May 24, 2010, 19:20:40 pm »

Hey Carsten now I have two of them  Grin
Should be 1/2 loud as one,or?  Wink

finished the Dual glaspack with adjustable mounts that go to header clamps. The adjustment and exact fittig was very time robbing and I first went with a straight setup to the end panel which looked very bad. So I cut it in pieces again and went with an angled fittig.


I now came with an other solution to stay with the orig. cooler look and have some oilflow in that section.
Freed for 1/4 to AN-6 Adapter


The tube got some little grooves athough I filled it with sand and taped it before bending. Not good looking but raw...I will block the first adapter and drill it to 2-4mm to reduce the oil flow tru that section.


Cooler spaced


Stock looking as I wanted it. Other main advantage is that I must not modify the 3/4 enginetin:


A Kerscher discbarke isn`t a bad idea to compensate the 2,2l power that hepefully will be in action soon...The header paint will rub off quick.
Logged
Nico86
Hero Member
*****
Posts: 6354


Turnip engine.


« Reply #36 on: May 24, 2010, 23:00:21 pm »

Nice job, that type 3 is great !
Logged

Carsten
Full Member
***
Posts: 141


« Reply #37 on: May 25, 2010, 08:56:07 am »

Looks good ! Where do you get the mufflers/Glaspacks from ? Which diameter do they have ?
Greets , Carsten
Logged

1969 IRS bug
Jon
Administrator
Hero Member
*****
Posts: 3214


12,3@174km/t at Gardermoen 2008


WWW
« Reply #38 on: May 25, 2010, 12:08:48 pm »

Great idea on that exhaust!!  Shocked  Thinking outside the box!
Logged

Grumpy old men have signatures like this.
Felix/DFL
Sr. Member
****
Posts: 386


WWW
« Reply #39 on: May 26, 2010, 23:13:55 pm »

Thank`s guys!
The glaspacks are from CSP an 2" outer diameter
Logged
Type1/DVK
Sr. Member
****
Posts: 315


« Reply #40 on: May 27, 2010, 19:25:09 pm »

enough flow trough that curved pipe? if you'd filled it with a copper wire it won't flatten when bending.

Nice mod's! keep up the pace and pictures!
Logged

DDD#8 - 14.74sec @ 1776cc - Member of:  DVK ~ Der Vollgas Kreuzers  - www.ultimatevw.nl - and racing engines
Jesse/DVK
Hero Member
*****
Posts: 817


'64 2176cc


WWW
« Reply #41 on: May 27, 2010, 20:45:06 pm »

Nice going Felix! Will it be ready for DFL 402? Would like to race you  Grin
Logged

Der Vollgas Kreuzers
Felix/DFL
Sr. Member
****
Posts: 386


WWW
« Reply #42 on: May 28, 2010, 11:42:03 am »

Hey Jesse,

sadly the notch will not be ready for DFL402/Bitbug...I am a bit pissed about that point, cause last year I could make many passes and tests at DFL402/Bitbug absolutley not comparable with Dragday. To less time at the moment to wrench...

Case is still not mounted finally. I wanted to do the exhaust first (case without interna) and then complete the engine clean.
All pan`s need to be glasblasted & painted, oil cooler clamp and air duct ist still not made and 100 other little things Wink
Hope to complete the engine in 1-2 months.

@Jesse: Race at Dragday  Cool

@ Typ1/DVK:
A cooper wire is a good trick I will try that out on the next engine Wink

I WANT to reduce the oil flow at that spot. There is now bearing that needs oil after the cooler. A massive oil flow at that point could even be a problem...I will reduce the bore at the first AN Adapter to a 2-3mm bore. Only the air should get out of that section...


Greetings,
Felix
Logged
Diederick/DVK
Hero Member
*****
Posts: 3692


They're never done till they're sold


WWW
« Reply #43 on: May 28, 2010, 12:18:35 pm »

felix, why not drop in the 1776?
see you at DFL 402 Smiley
Logged

Diederick
 -
Proud member of:
DVK ~ Der Vollgas Kreuzers
Felix/DFL
Sr. Member
****
Posts: 386


WWW
« Reply #44 on: May 29, 2010, 13:52:04 pm »

felix, why not drop in the 1776?
see you at DFL 402 Smiley

I don`t want to step back man... Another thing is that the 1776 doesn`t exist anymore.

There is only the short block left. Heads & cylinders are sold and I have bought a 94mm cylinder kit   Wink
Crank (78 or 82mm) and heads next year.

Have you painted your case already?
Logged
Felix/DFL
Sr. Member
****
Posts: 386


WWW
« Reply #45 on: May 29, 2010, 14:23:32 pm »

In the last days I finished the heads for the second time... Roll Eyes

I had to cut the heads a bit deeper for the wanted compression of 10.5. So I needed to extend & smooth the outer section to cylinder wall again.
Firts time the heads were cut I was a bit to discret with the depth so the heads came out with a 9.5 compression. My fault...

Marked with cylinder


raw stadium


After a bit smoothing I brung all combustion chambers to the exact volume. At one head both chambers were very close. The other head differed about 1ml. I removed material behind the sparkplug. That bbrings the spark a bit more to the middle of the bowl.


3 Holes made the process easier.


A burette is such a nice working tool. The injection method I even worked with before is way to inexact. Try to get 3 exact same readings with the injection and you will see what I mean.


finished


After that I cut back the exhaust guides as they extend way to much into the port. I didn`t want to cut them back complete to make the life a bit easier for the guides...


Logged
Felix/DFL
Sr. Member
****
Posts: 386


WWW
« Reply #46 on: June 21, 2010, 11:46:25 am »

back on the track...

The long block is now finished.  Grin

Sadly I couldn`t make too many pics as my camera is dead. So I had to borrow me one.

I extended the orig. pick up tube and slided/hammered a bigger pipe over the existing and welded them together for safety. The end is made a bit smaller on a lathe to fit into the oil screen which I extended a bit.
I taped the pipe into the case with sealant to make a 100% leak proof connection.

Much much much time was spent to get ALL parts really clean. It`s interesting how dirty even new parts are. The total seal rings were one of those canidates.

Case is sealed with Loctide 574, cylinders and washers with Dirko HT.I got some big SW15 head nuts plated for the case assembly gives a good contrast to the black.
The head nuts are of course even plated and the big washers.

Next step (and one step further to drive  Wink ) is the complete engine tin which needs to be painted.
Logged
nicolas
Hero Member
*****
Posts: 3996


« Reply #47 on: June 21, 2010, 12:05:24 pm »

hey, looks really good. but quick question. what paint did you use on the case? that looks good.

Logged
Rick Meredith
DKK
Hero Member
*****
Posts: 5312


We can't force ya to have fun


« Reply #48 on: June 21, 2010, 18:44:44 pm »

Stupid Question... aren't the case nuts on backwards? Shouldn't the red seal go towards the case against the washers?
Logged

67 Beetle - The Deuce Roadster of Cal Look
GeirH
Newbie
*
Posts: 39


« Reply #49 on: June 21, 2010, 21:55:55 pm »

Stupid Question... aren't the case nuts on backwards? Shouldn't the red seal go towards the case against the washers?
Well that's one of the Berg trick's..
Logged
Rick Meredith
DKK
Hero Member
*****
Posts: 5312


We can't force ya to have fun


« Reply #50 on: June 21, 2010, 22:31:10 pm »

Hmmm. never saw that one before
Logged

67 Beetle - The Deuce Roadster of Cal Look
Felix/DFL
Sr. Member
****
Posts: 386


WWW
« Reply #51 on: June 22, 2010, 12:59:10 pm »

hey, looks really good. but quick question. what paint did you use on the case? that looks good.

Thank ya man.
I have used VHT engine enamel burned in in an oven.

@DKK Rick: As Gäschen said it`s an old berg trick. I think the idea behind is that the plastic seal will give an incorrect torque AND the nut may get a bit looser after some heating and cooling cycles.
Logged
Zach Gomulka
Hero Member
*****
Posts: 6991


Don't piss down my back and tell me it's raining.


« Reply #52 on: June 22, 2010, 17:18:31 pm »

Superb attention to detail Smiley
Logged

Born in the '80s, stuck in the '70s.
Nico86
Hero Member
*****
Posts: 6354


Turnip engine.


« Reply #53 on: June 24, 2010, 22:44:13 pm »

I like the black engine case.
Logged

Diederick/DVK
Hero Member
*****
Posts: 3692


They're never done till they're sold


WWW
« Reply #54 on: June 25, 2010, 23:43:29 pm »

so do I  Grin

when is the next update felix? get to work Wink
Logged

Diederick
 -
Proud member of:
DVK ~ Der Vollgas Kreuzers
Felix/DFL
Sr. Member
****
Posts: 386


WWW
« Reply #55 on: July 29, 2010, 21:38:24 pm »

long time no update as I was on holiday and had some other things to do.But in the next days some things will happen.
I got the complete engine tin back from the powder coating which will be mounted soon.

Since the last update I have only made some small things as completing the valve train and shiming the CB rockers for correct side play.
Sadly I had to drill the mounting holes in my race trim valve covers bigger to get them mounted. Before I could only mount one screw each side.
So belive me when pre mounting your engine mount every part... The better mod would had been to gring away material at the heads...

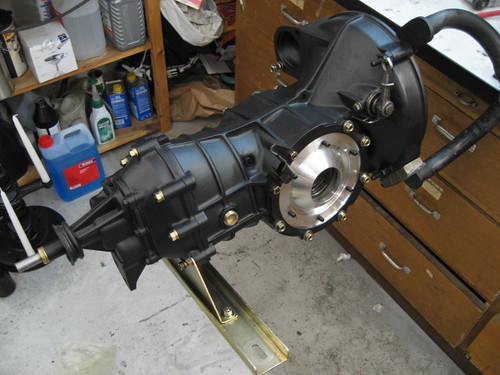
So this time some words about the gearbox that were build at the beginning of this year. As I have sended a gearbox with my 1776 to heaven I didn´t want to cut corners and do it after the engine is completed and have gone thru and orig gearbox.

The gearbox is made out of an early typ-3 4,125 box and an late IRS 72- one cover box.
My goal was to get the best out of orig. VW parts.

The specs are
R&P: 4,125
1st: 3,78 (late shaft)
2nd: 2,06
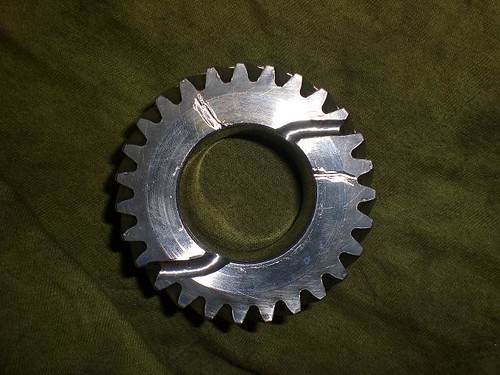
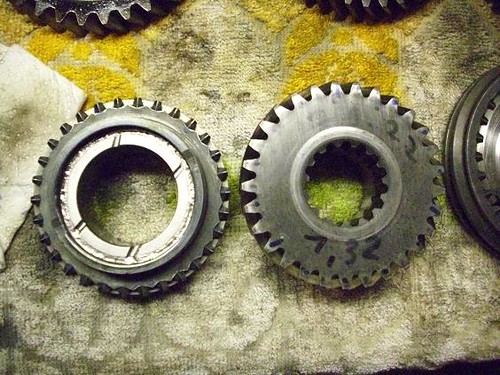
3rd: 1,32 (the shortest vw availabale) (raw teeth/syncs welded)
4th: 0,89 (raw teeth/syncs welded)
and last but not least an NOS ZF LSD

It`s an compromise between fast accelarating 1-3 and an overdrive 4th for easy autobahn cruising. An orig. 0,93 4th would have made the gap 3-4 smaller but I wanted an 4th for traveling in excaptable speeds over the autobahn.

With mixing up the parts late/72- you could get the best out of an orig. box. The late 72 1&2nd shaft for hard starts and the late 3&4 raw teeth gears for more strenght.
But the sync/gearholders of the 3&4th gear need to me modified to fit on the late shafts, or the shaft could be moded. I n my case the gears were moded.

Mailny of the work was done by a club mates brother (D. Göhner) which did an superb job and has all the knowled and the needed special tools for measuring and adjusting everything.

Some other work was done in the south of D by a man called M. Dietrich which made some cool mod`s.
The base:


Many bearings were made new even the big ones in the side covers and of course the often overlocked mainshaft bearing at front. The orig. R&P bearing cover plate was exchanged against an Cromo housing.
Aditional oil channels were made:


laser welded synch and aditional oiling:


LSD setup:

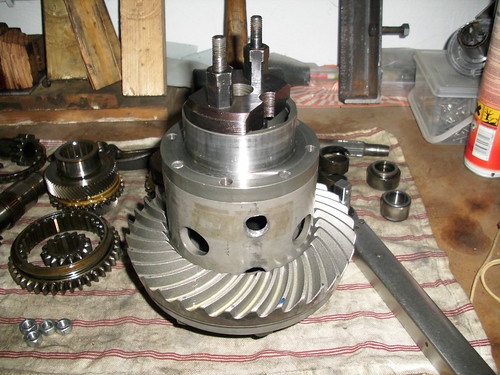
The R&P are both glas pearl blasted for an better oil film. There are some extra holes in the LSD housing for additional oiling. A big thank ya to Bruce for huge info support about the LSD theme!

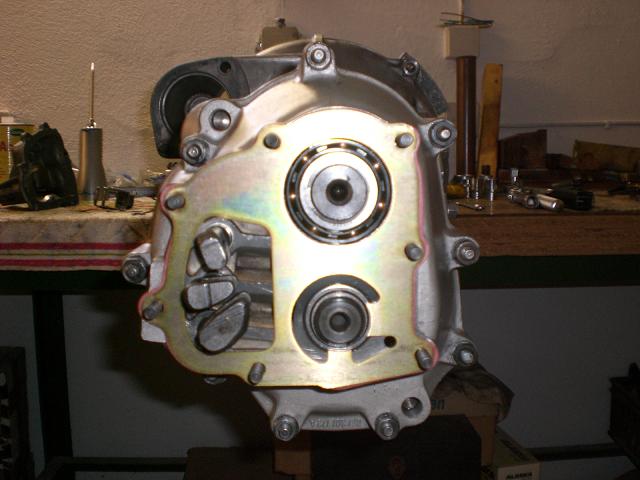
some words about the front cover:


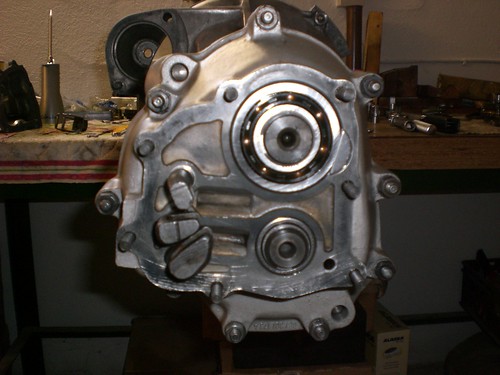
The shift forks are now teflon bushed and the box shifts like a dream at stand. The main bearing is now secured by an key so that the outer ring could not turn in the cover.
A neat trick of mister Dietrich is the cover plate he lasers to get the shafts supported well axial.


done:

I pre polished the fins to get it detailed but as it was painted I left it so cause it will fit the engine case better. Very good that I spended some... hours of grinding and pre polishing the fins  Roll Eyes

The sharp intersection at the ends of the driveshafts were grinded smooth and polished to prevent breaking. I will see if that will hold but I wanted to try that before buying china parts... Oversize "halfmoon stones" the ones with the groves are beeing used in the diff.

Logged
Tobi/DFL
Sr. Member
****
Posts: 444


« Reply #56 on: July 30, 2010, 08:22:52 am »

Fabulous work as usual, Felix! Too bad that I won´t be able to see your new engine debute on the sticky Bitburg track at DDDay. Sad

Looking at the mods at your gearbox I´m really thinking about asking Dirk to redo my gearbox once again to get the bushed shift forks and the keyed main bearing (both of which are problem areas in my gearbox).

When rebuilding my engine over the winter months I am sure to take care of some of the many small modifications you did to your engine as well. Thanks a lot for writing about all that in detail and taking the associated pictures - it´s a great help! Smiley

Tobi
Logged
Jesse/DVK
Hero Member
*****
Posts: 817


'64 2176cc


WWW
« Reply #57 on: August 04, 2010, 10:40:11 am »

Awesome work again Felix!
Logged

Der Vollgas Kreuzers
Felix/DFL
Sr. Member
****
Posts: 386


WWW
« Reply #58 on: August 10, 2010, 20:56:12 pm »

ThanKs for all tose kind comments!

Update:
I sandblasted the small 0,3ltr. boxes and painted them with wrinkle paint to get oit look a bit better.
The boxes will mount at the rear of the engine compartment. If someone has to nice ratrimboxes or old claude buggies one`s please feel free to contact me.


I screwed in 3/8 NPT thread and blocke two of the holes with plugs and replaced the very restrictive "foam" with steel-wool


Some detail shoots:


Tewo 45° angle gives good room along the fan housing:


Late oil cheking tube with drain back pipe to the orig. breather box:


009 dizzy with ignitor made old with wrinkle paint:


Mounted some of the coated tin and the fan. You got to bet sure that the fan is tighted propperly. I mounted my with 200Nm and loctide tight


For tightening the flywheel with 400Nm (Cromo screw) I buyed myself a 100-500Nm torque wrench. Before I always mounted the Screw with an long pipe and calculated the torque / distance where to go on the pipe with my body weight. As I am as many others Wink are a tool nerd I had to have one to do it wright. Wasn`t that expensive as I thougth.e-bay has so good & cheap ones.


One problem I came across was that an orig. VW O-Ring came between the crank/flywheel. I had a bad feeling when i mounted the flywheel even before as the ring wasn`t so tight at the outside of the flwheelgroove so I remove it again. And it was good that I did. The champfer at the crank is very small so the ring can get between.

After that issue I mounted an new ring from CSP which sat tighter at the outside, and it worked out.


Marked the fan with the timing marks correctly even marked 32° to ckek full advance of the dizzy and 7,5° for 2nd 3rd and 4th cylinder to check if the ignitor module (magnet locations on the inner ring) works like it should be.


The room to be filled. I mounted the mallory coil at the side. I really like the look of those ones!


And here we go:


racetrim covers and sump:


My workbench now really looks empty without the engine hanging in front of it. But I will get used to it  Wink
Many small things to be done. More later...
Logged
wolfswest
Hero Member
*****
Posts: 1233


« Reply #59 on: August 11, 2010, 07:51:17 am »

looking good!  Shocked
Logged

JPS NACIONAL kameraderie - HDB Syndicate.
Pages: 1 [2] 3 4 Print 
« previous next »
Jump to:  

Powered by MySQL Powered by PHP Powered by SMF 1.1.21 | SMF © 2015, Simple Machines Valid XHTML 1.0! Valid CSS!