|
andy198712
|
 |
« on: November 09, 2012, 09:28:26 am » |
|
It's been a long time collecting parts and saving the money (why does it always cost about 4 times as much as you think?) Here's my spec i currently have: - Dual Relief case cut for 90.5's will be clearanced for 82mm - 044's cut for 90.5 unshrouded, smoothed and oval ported by myself, CCing at 55 at the minute. 40x35 - Bugpack forged 1.4's - Bugpack HD alu push rods (bit dubious to use these) - CB nitrided 82mm crank - CBunitech HD plus rods end to end balanced by me. - 2 stage dry sump pump (60/30) - steel backed main bearings, dual thrust cam bearings and rods. Whats still to buy: -TP's 57g tool steel lifters -Cam (i was thinking 86B but may sway back to the FK8 again now) -90.5 strokers will be balanced to 0.1g The engine is going i na beetle, and i would like it to be a strong engine, have good power across the range and pull hard on top if needed. it will be EFI's with Megasquirt, crank fired and using GSXR TB's to cover the injection side of things. my goal is 150bhp and daily driven with long distance capabilities. all the friction surfaced i will be coating with DFL-1, the chambers, valve faces, piston tops and ex port will be thermal barrier coated by me. i know the dry sump and coatings may be a bit OTT but i enjoy a challenge and doing stuff my self. most of my time thus far has gone into the heads and the rod balancing, hopefuly getting the DFL-1 arriving this week and can start on the parts to coat. Pics to follow  |
|
|
|
|
 Logged
|
|
|
|
|
andy198712
|
|
« Reply #1 on: November 09, 2012, 09:42:36 am » |
|
So first up was just checking through the rods marking with poor mans blue and fitting then stripping 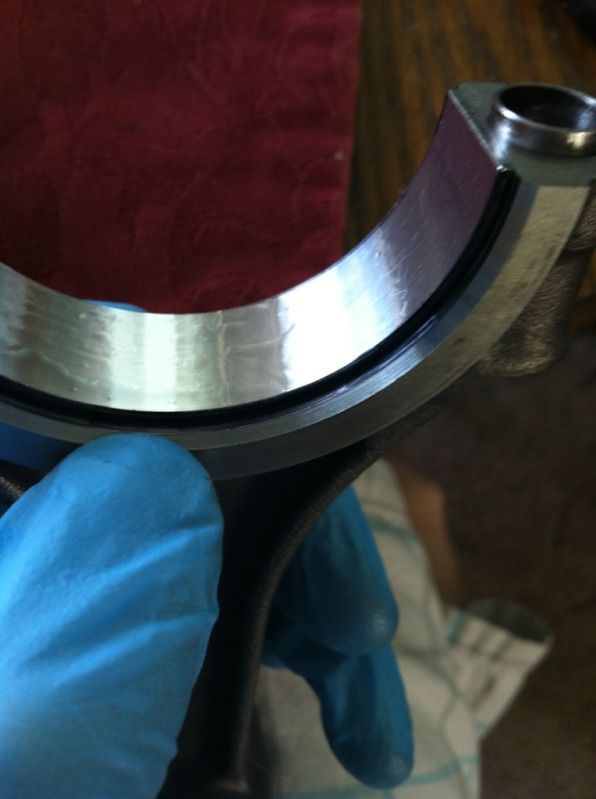 same on the crank radi (hard to see but was fine) 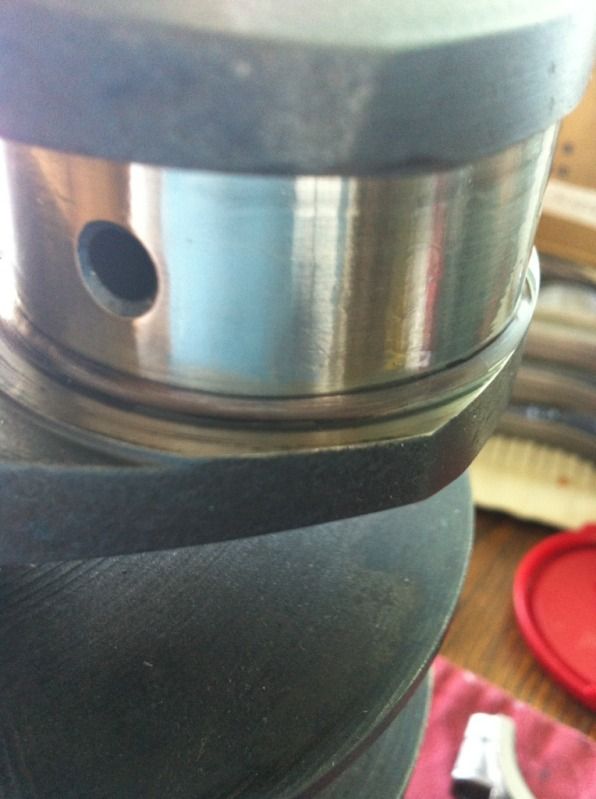 kitchen table while the Mrs is out! 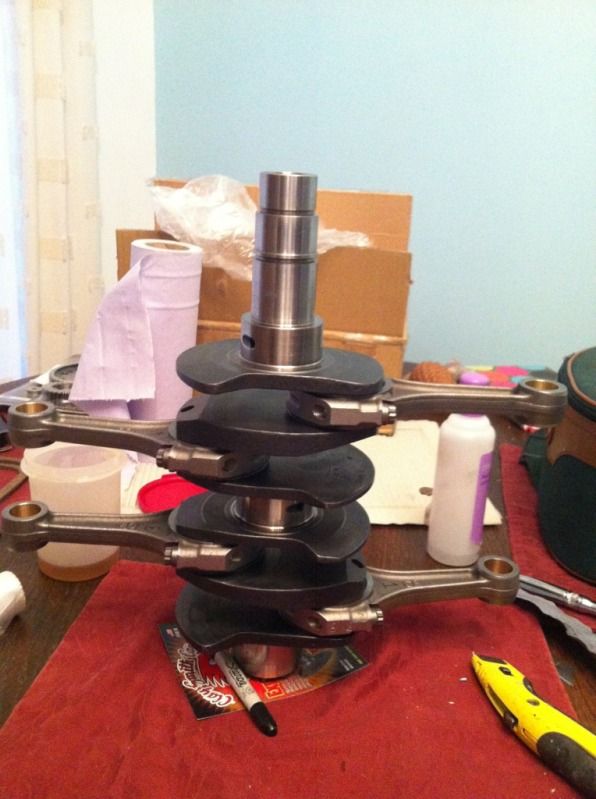 all marked up and idiot proof 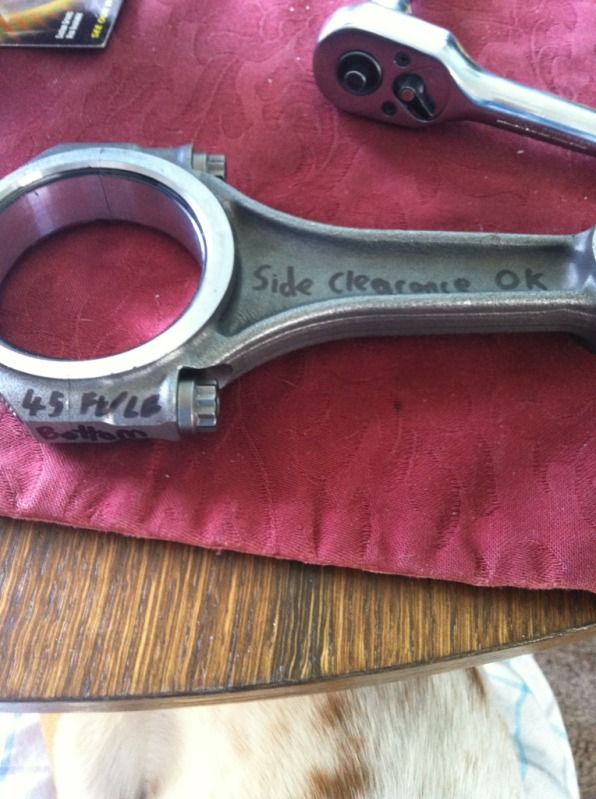 sideplay checked and ready for notching and balancing 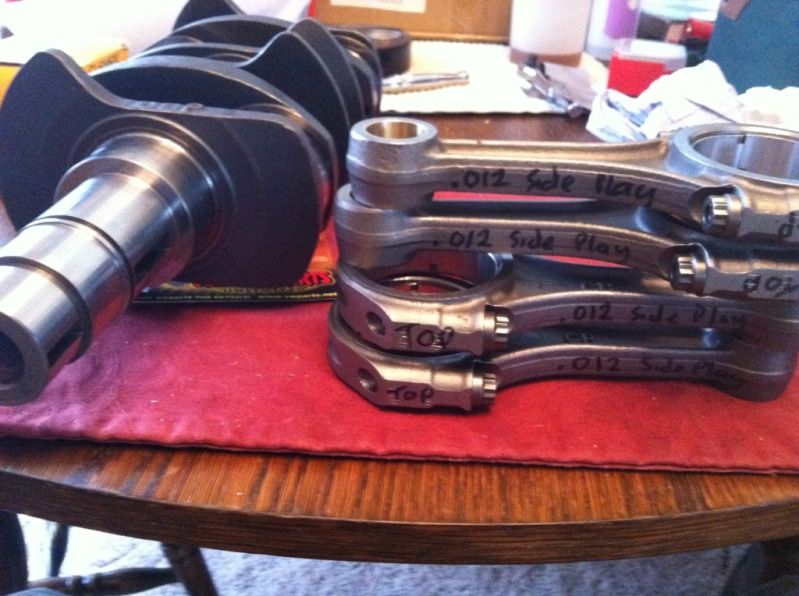 This burr worked well for the notching, wether it helps or not, who knows but i thought it cant hurt 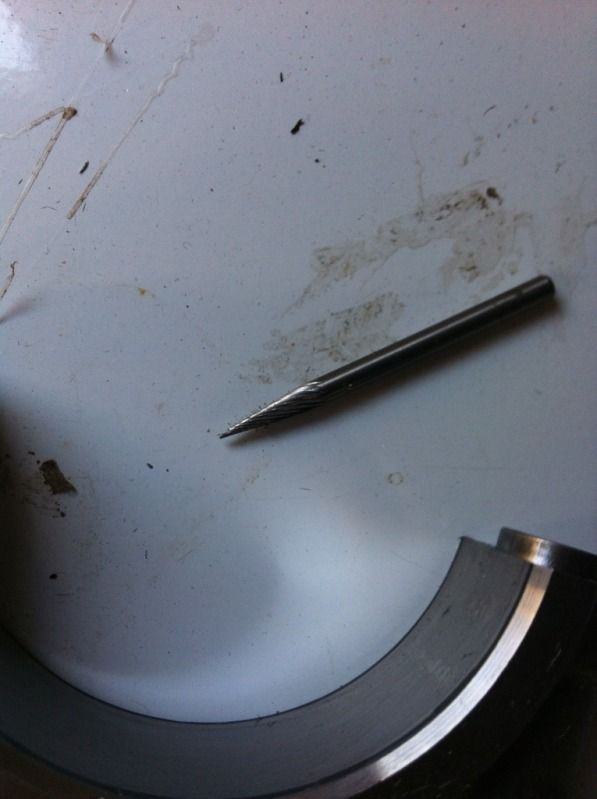  |
|
|
|
|
Logged
|
|
|
|
|
andy198712
|
|
« Reply #2 on: November 09, 2012, 09:46:12 am » |
|
Next up came the balacing, overall weight they were very close.... but i wanted better so borrowed and mod's a jig to end to end balance them.... this took hours and hours due to checking 3 times every measurement and the jig had to be perfect. ended up with this 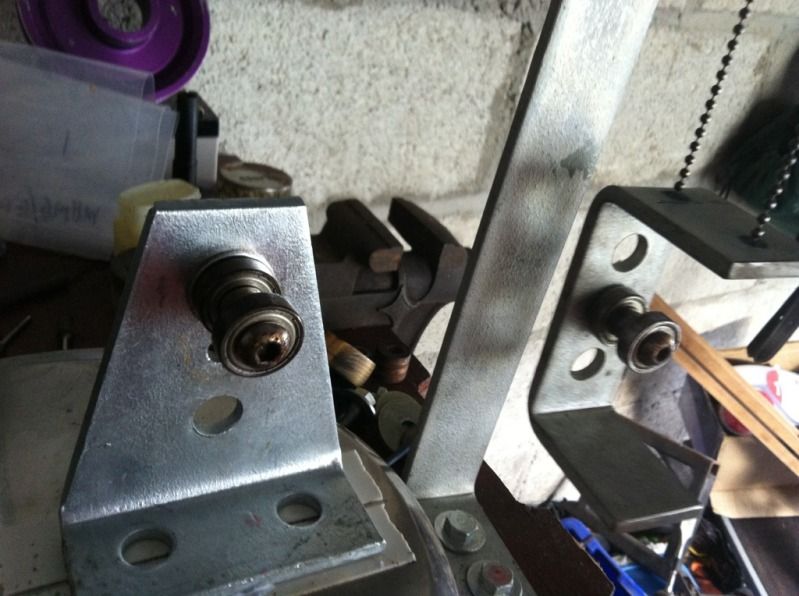 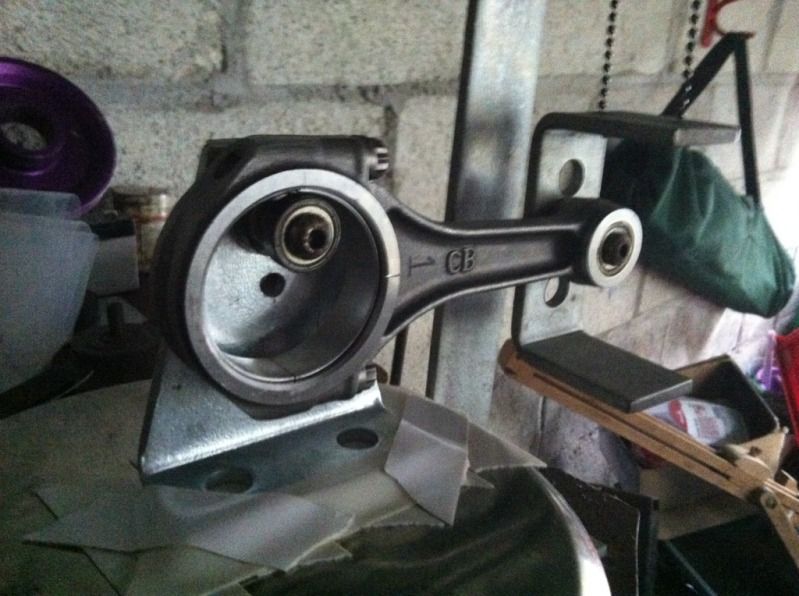 my aim was to get the big ends within 0.1g of each other, they started off 3g out on the big end, which isnt bad compared to some stocks that were way out! |
|
|
|
|
Logged
|
|
|
|
|
javabug
|
|
« Reply #3 on: November 09, 2012, 13:09:14 pm » |
|
Your spec is very close to what I'm running. If everything works out you'll be pleased with it. I have the 86b, almost stock gear ratios, and the car so far has run 13.60 @ 97 on radials. It will drive as far as I want to.
|
|
|
|
|
Logged
|
Mike H.
Sven was right.
|
|
|
rspsteve
Jr. Member

Posts: 57
|
|
« Reply #4 on: November 09, 2012, 13:46:39 pm » |
|
Looking good mate....i dont have a clue but will be watching with great interest....lol
|
|
|
|
|
Logged
|
|
|
|
|
andy198712
|
|
« Reply #5 on: November 09, 2012, 13:52:37 pm » |
|
Your spec is very close to what I'm running. If everything works out you'll be pleased with it. I have the 86b, almost stock gear ratios, and the car so far has run 13.60 @ 97 on radials. It will drive as far as I want to.
nice thanks bud!! |
|
|
|
|
Logged
|
|
|
|
|
andy198712
|
|
« Reply #6 on: November 09, 2012, 13:53:26 pm » |
|
Looking good mate....i dont have a clue but will be watching with great interest....lol
stare long enough and it'll make sense..... works for me  |
|
|
|
|
Logged
|
|
|
|
rspsteve
Jr. Member
Posts: 57
|
|
« Reply #7 on: November 09, 2012, 13:56:58 pm » |
|
Lol ...i will do ..where in uk?
|
|
|
|
|
Logged
|
|
|
|
|
cedric
|
|
« Reply #8 on: November 09, 2012, 15:18:44 pm » |
|
Nice work and nice jig kan you ake some pics of it
|
|
|
|
|
Logged
|
|
|
|
|
MeXX
|
|
« Reply #9 on: November 09, 2012, 16:25:20 pm » |
|
The engine is going i na beetle, and i would like it to be a strong engine, have good power across the range and pull hard on top if needed.
it will be EFI's with Megasquirt, crank fired and using GSXR TB's to cover the injection side of things.
my goal is 150bhp and daily driven with long distance capabilities.
Hi The engine in my street car is similar: I also run Megasquirt with coil on plug it's a MS II extra; You will love it !!! I also have done a lot of coating on the parts : CBC2 & DFL1 So if U need some help let me know.
<a href="http://www.youtube.com/v/GYTvsVQviXU" target="_blank">http://www.youtube.com/v/GYTvsVQviXU</a>U will love the MS features like flatshift MeXX |
|
|
|
« Last Edit: November 09, 2012, 16:33:13 pm by MeXX »
|
Logged
|
Drag or Die
|
|
|
|
andy198712
|
|
« Reply #10 on: November 12, 2012, 12:11:00 pm » |
|
Lol ...i will do ..where in uk?
Cornwall  |
|
|
|
|
Logged
|
|
|
|
|
andy198712
|
|
« Reply #11 on: November 12, 2012, 12:16:40 pm » |
|
Nice work and nice jig kan you ake some pics of it
i borrowed it from a friend. took hours to perfect and everything has to be exactly the same every time to get exact results, probably spent 6 hours fiddling and 2 actually balancing. just like this only i swapped the disks for bearings  frustrating to say the least |
|
|
|
|
Logged
|
|
|
|
|
andy198712
|
|
« Reply #12 on: November 12, 2012, 12:17:17 pm » |
|
The engine is going i na beetle, and i would like it to be a strong engine, have good power across the range and pull hard on top if needed.
it will be EFI's with Megasquirt, crank fired and using GSXR TB's to cover the injection side of things.
my goal is 150bhp and daily driven with long distance capabilities.
Hi The engine in my street car is similar: I also run Megasquirt with coil on plug it's a MS II extra; You will love it !!! I also have done a lot of coating on the parts : CBC2 & DFL1 So if U need some help let me know.
<a href="http://www.youtube.com/v/GYTvsVQviXU" target="_blank">http://www.youtube.com/v/GYTvsVQviXU</a>U will love the MS features like flatshift MeXX sweet!! i'll PM you |
|
|
|
|
Logged
|
|
|
|
|
andy198712
|
|
« Reply #13 on: November 12, 2012, 14:49:05 pm » |
|
|
|
|
|
|
Logged
|
|
|
|
|
andy198712
|
|
« Reply #14 on: November 12, 2012, 15:16:41 pm » |
|
with the heads i started with a set of CB 044's with 40x35 valves dual springs standard round port, i brought these lightly used locally. i'm no pro and if i'm honest this is the first set of VW heads.... or any heads i've ported so dont bite my head off i went for an oval port design measuring about 39mmx32mm, i didnt want to go huge due to the small valves (ish) and displacement, still wanting good port velocity and VE. i also unshrouded the inlets to the cylinder wall and slightly the exhausts, then smoothed them all out and will be coating with a thermal barrier coating (see a theme here ) With the CB heads you need to do alot of work to the cooling passages as most are blocked, i also added a hole at the ex port area to allow flow over that.... So, Made up a template 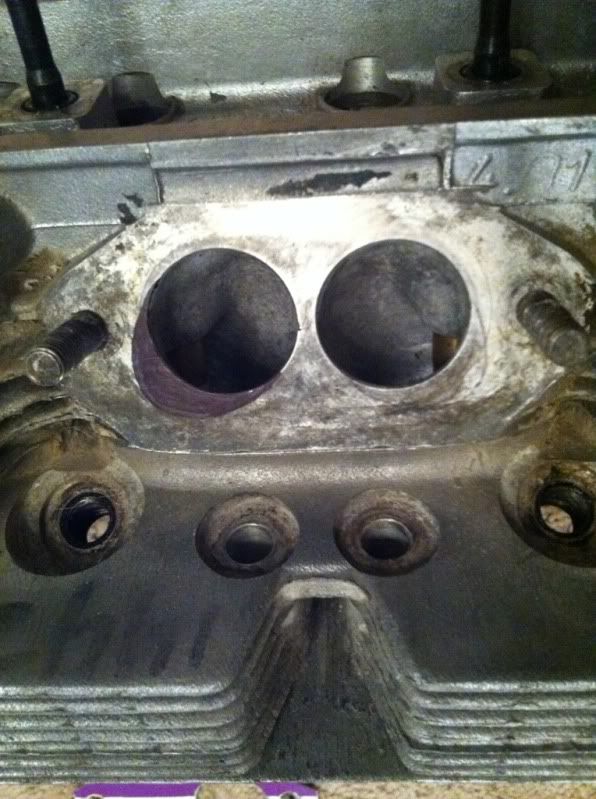 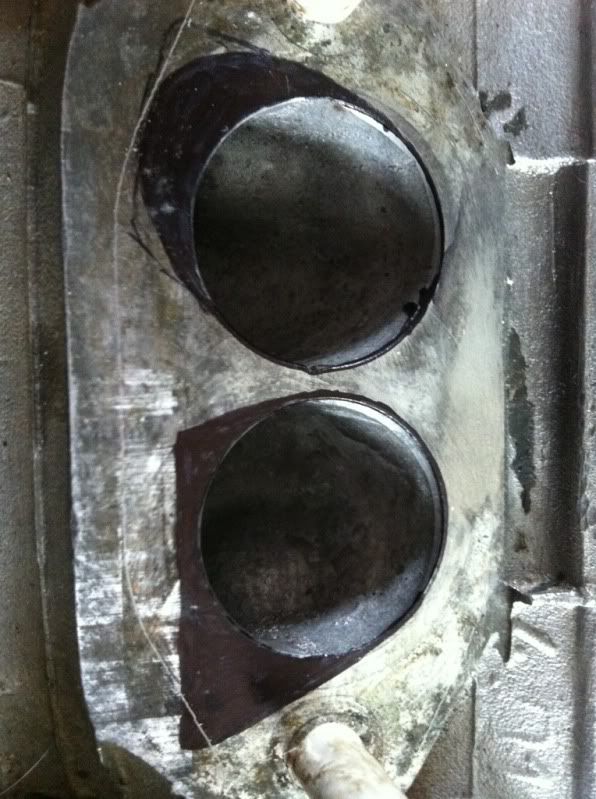 Got to work with the burrs 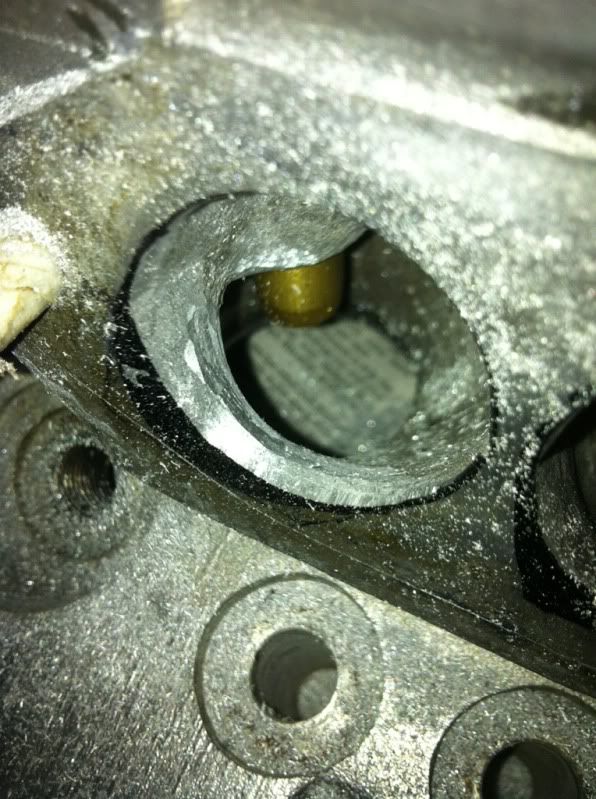 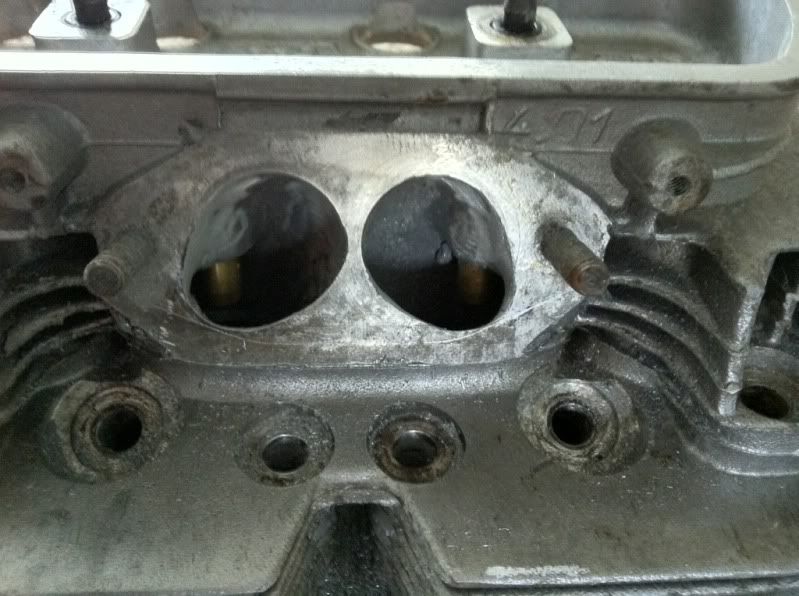 i kinda did the ports by feel, running my fingers down to feel for symmetry and all that jazz 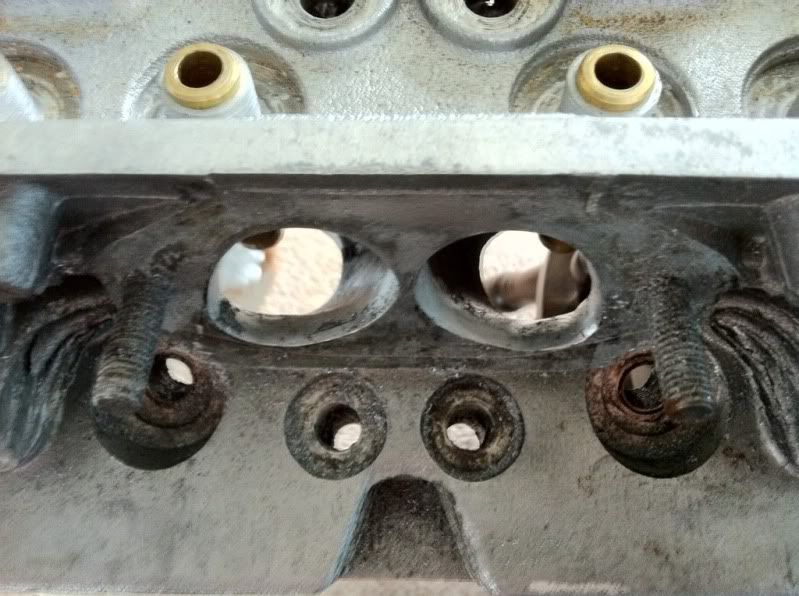 so after many many hours messing with burrs i switched to the sanding rolls and blended the seats to the ports, i then started on the chambers scoring out the cylinder walls and unshrouding to there, also removing the many sharp edges CB left in the chambers 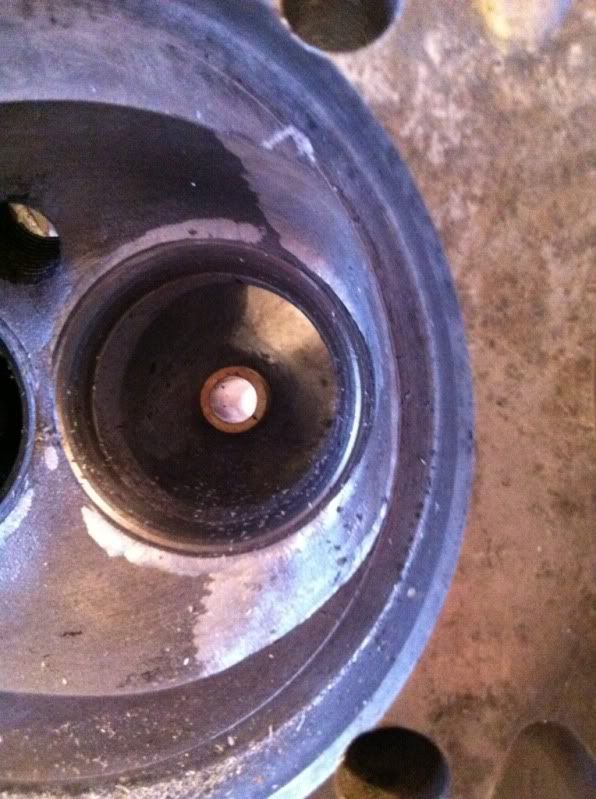 slowly getting there 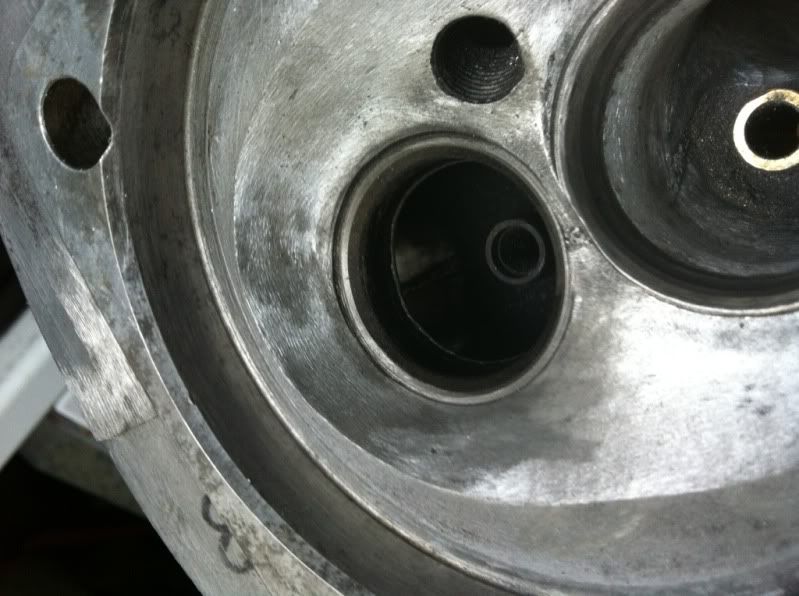 comparison of shrouded and unshrouded at equal lift 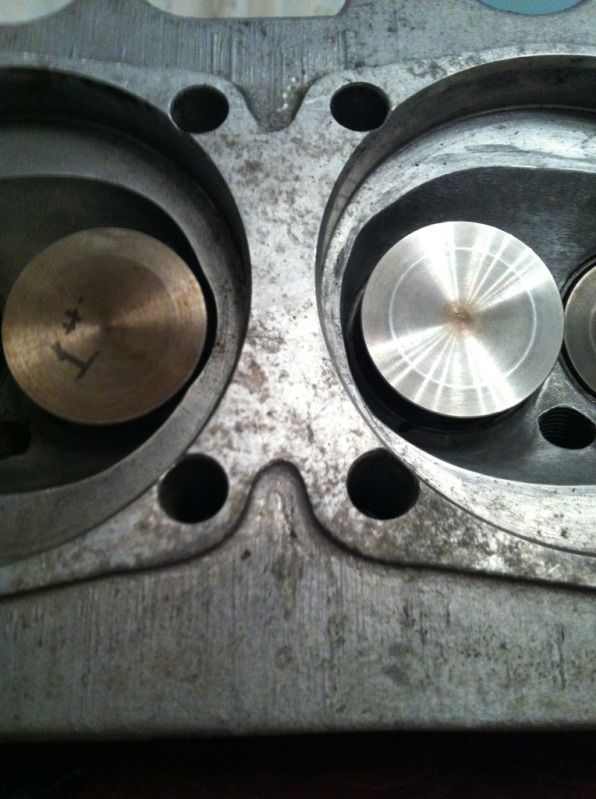 and a quic port pic 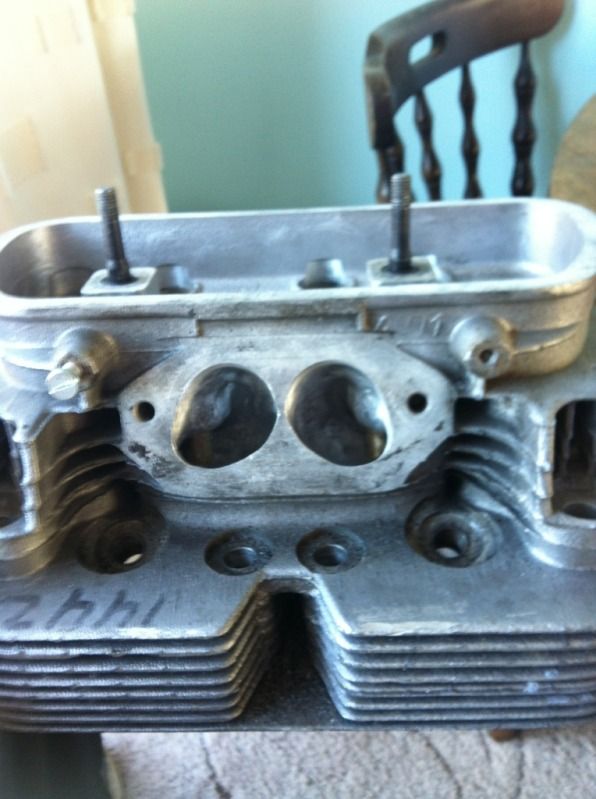 ready for flycutting then coatings 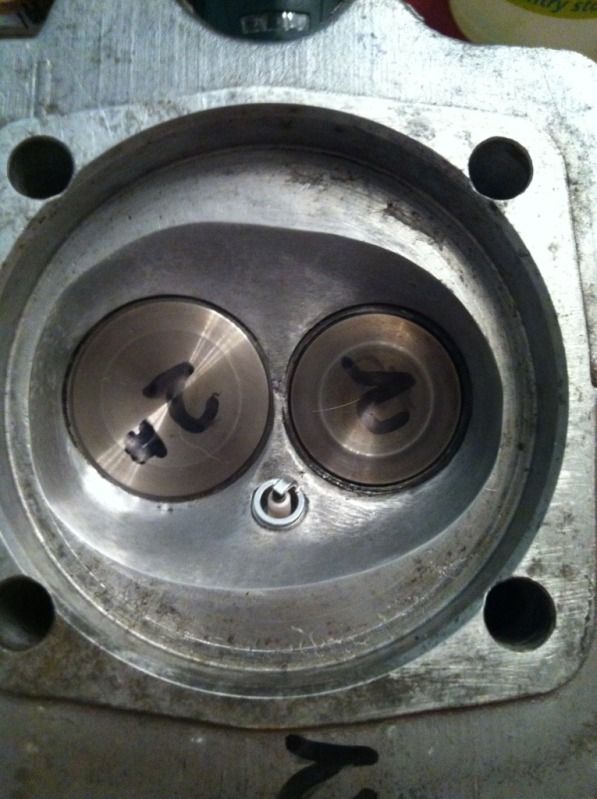 hopefuly i've made some improvments and not just ruined them completely.... i know they wont be anywhere as good as a expert ported set but we all start somewhere! if they run utter shite i think i'll speak to JMR about a new set but hopefuly they'll do! |
|
|
|
|
Logged
|
|
|
|
|
andy198712
|
|
« Reply #15 on: November 12, 2012, 15:42:45 pm » |
|
i'll try and dig out my blueprint sheet for the rod weights but here's the little ends 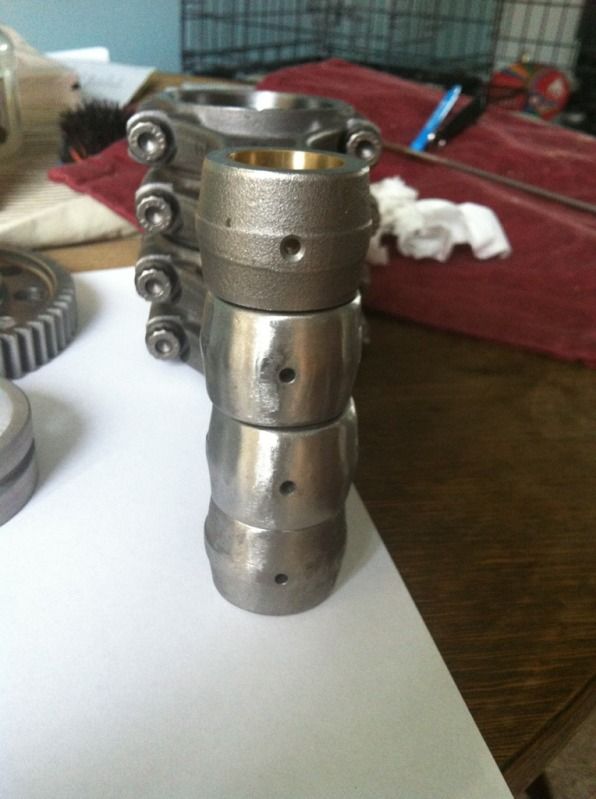 and big ends 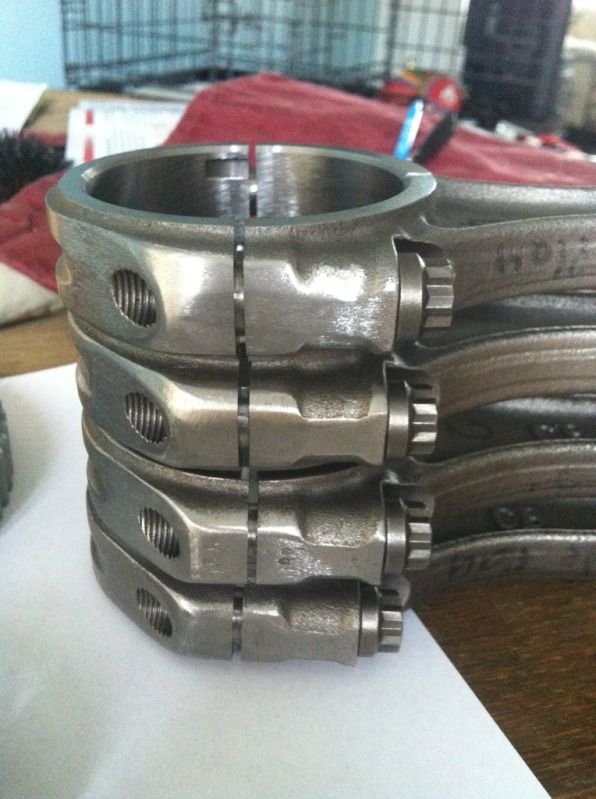 the big ends i got to near enough 0.1g differance, and the little ends are about 0.3g differance and i called it good! you can spend hours chasing 0.1g's here and there i found so called it good at where i was. So my big ends started off at: 419.4g 417.8g 417.6g 416.3g after a few hours they were 416.2g 416.3g 416.2g 416.3g so i was happy with that! i used the little ends to adjust total weight.(with bearings) Total weight after that started at 600.9 602.8 600.4 599.7 after a while i got those to: 599.6 599.6 599.7 599.9 These are the final weights as i after doing the big ends, then little ends then adjusting big ends again i realised i would spend a life time getting them perfect, thus i settled for 0.3g variance on the total weights. as i see it, the big ends are more important then the little end weight slightly... as the big ends contributes to the reciprocating weight and dynamic balance of the crank, and the little ends mearly go up and down so dont play AS bigger part. but still 0.3g is a good tollerance for a DIY job if you ask me. just adding up how many times i adjusted the weights on the rods.... 25 adjustments(removing material) and checked each weight 3 times.....  |
|
|
|
|
Logged
|
|
|
|
|
andy198712
|
|
« Reply #16 on: November 23, 2012, 12:23:55 pm » |
|
Things have been a bit slow lately!
been lapping in the valves and will leak test later (half already done) also been waiting on a spray gun to arrive so i can coat my bearings with DFL-1.
Sorely tempted to go with a 911 style shroud!! i know they arent the best, but can be made pretty good..... its purely a guilty pleasure the sexy looks!!
|
|
|
|
|
Logged
|
|
|
|
rspsteve
Jr. Member
Posts: 57
|
|
« Reply #17 on: November 23, 2012, 13:59:42 pm » |
|
Keep going Andy...looking good .
Steve
|
|
|
|
|
Logged
|
|
|
|
|
andy198712
|
|
« Reply #18 on: November 27, 2012, 15:07:19 pm » |
|
Keep going Andy...looking good .
Steve
Cheers mate! i've just won a set of GSXR throttle bodies off ebay to use aswel which will be fun! |
|
|
|
|
Logged
|
|
|
|
|
Jeff68
|
|
« Reply #19 on: November 27, 2012, 19:12:50 pm » |
|
Hey Andy - Your project is looking good! I have a similar 2110 82 X 90.5. It's been a while since my engine was built but I think the skirts of my pistons had to be notched to clear the connecting rods. Did you have to do this mod to your pistons? I used Porsche length Carrillo H beam rods and Mahle / Cima 90.5 B pistons and cylinders (Berg specials). Just asking so that if you need to do this you don't balance your pistons and then find that they have to be clearanced for your connecting rods. Then you'd have to balance your pistons again.
Jeff
|
|
|
|
|
Logged
|
|
|
|
|
andy198712
|
|
« Reply #20 on: November 30, 2012, 10:30:50 am » |
|
Hey Andy - Your project is looking good! I have a similar 2110 82 X 90.5. It's been a while since my engine was built but I think the skirts of my pistons had to be notched to clear the connecting rods. Did you have to do this mod to your pistons? I used Porsche length Carrillo H beam rods and Mahle / Cima 90.5 B pistons and cylinders (Berg specials). Just asking so that if you need to do this you don't balance your pistons and then find that they have to be clearanced for your connecting rods. Then you'd have to balance your pistons again.
Jeff
i havnt brought them yet but thanks for the heads up other wise i would have balanced them without trial fitting my ITB's arrived, i took out the upper butterfly and split them in into two pairs.... pics to follow. Also my spray gun arrived so i can start coating my part today! |
|
|
|
|
Logged
|
|
|
|
|
andy198712
|
|
« Reply #21 on: November 30, 2012, 20:06:25 pm » |
|
|
|
|
|
|
Logged
|
|
|
|
|
Torben Alstrup
|
|
« Reply #22 on: November 30, 2012, 20:22:21 pm » |
|
Stay with the B cam over the FK8. You wohnt regret it. Scout´s honour.
T
|
|
|
|
|
Logged
|
|
|
|
|
andy198712
|
|
« Reply #23 on: November 30, 2012, 21:57:46 pm » |
|
Stay with the B cam over the FK8. You wohnt regret it. Scout´s honour.
T
Scouts honour!?!?! Well ok then Cheers |
|
|
|
|
Logged
|
|
|
|
|
andy198712
|
|
« Reply #24 on: December 02, 2012, 20:12:44 pm » |
|
does anyone know port size VS valve size? ie port cc? anyway.... ITB's..... GSXR 600 from 2006. Here is the plan: the '06 600 using a pump in tank design with built in reg..... meaning no return line. so i plan to go this route too, fit the pump into the tank and have one line coming out.....ideal! clean and tidy too. What i'll use for fuel line i dont know yet.... i'll chop the original fuel rail in half i think and then put fittings into the cut ends. they come with two injectors each and two butterflies each.... i removed the top butterflies which are fly by wire, and the top injectors didnt come with my ebay buy anyways. i need to plug the holes with JB weld (seems standard to do and use) 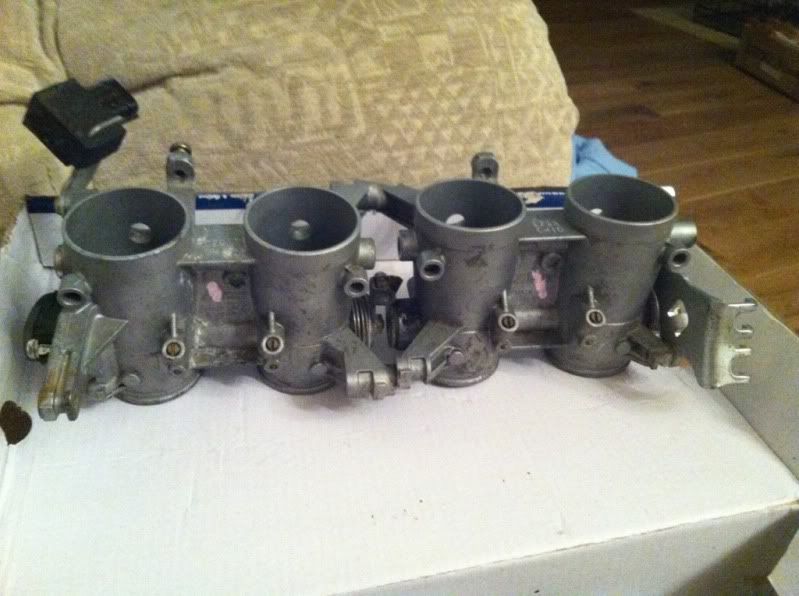 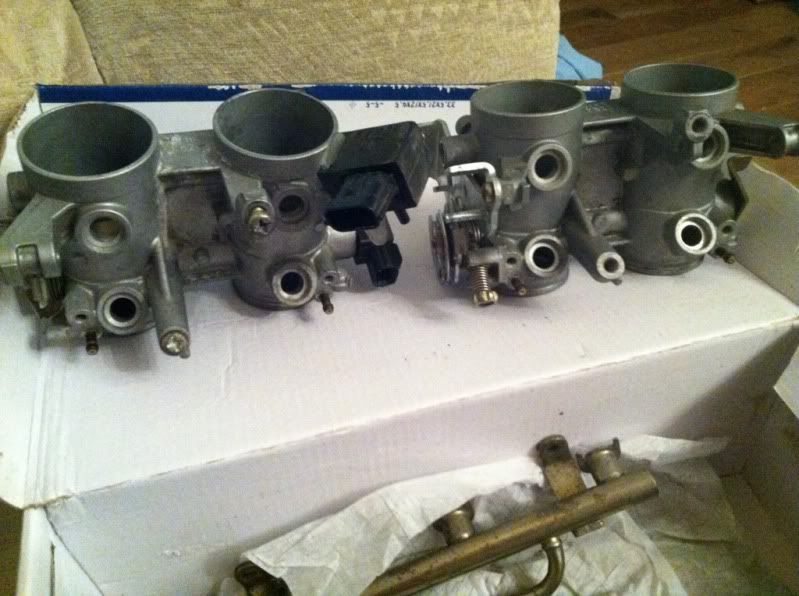 each one has its own little vac port, wether i use this for vac yet i dont know.... might work for an idle control valve? 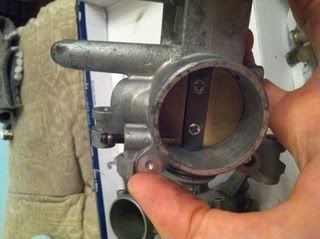 and each has there own bypass screw 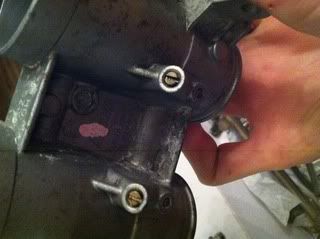 they taper from about 46ID to 40ID 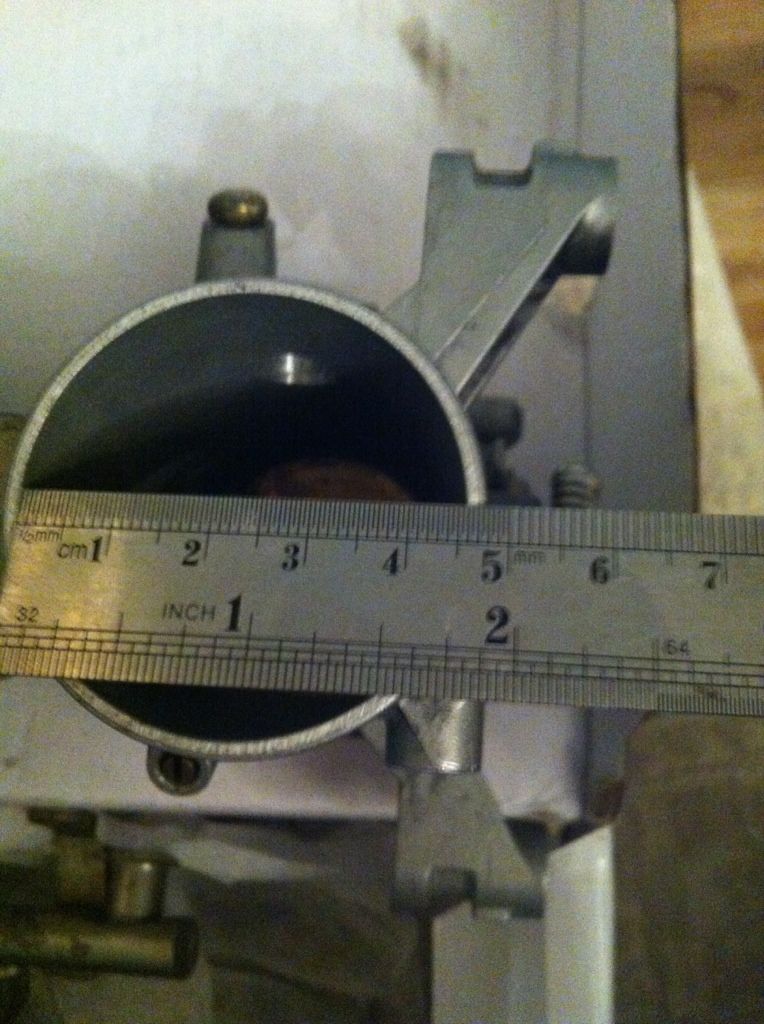  mounting them and working out how i'll open them is a whole other ball game! |
|
|
|
|
Logged
|
|
|
|
|
andy198712
|
|
« Reply #25 on: December 05, 2012, 23:04:24 pm » |
|
wondering if i should plonk it all in a wbx case and convert to oxy boxer....
|
|
|
|
|
Logged
|
|
|
|
|
Peter
|
|
« Reply #26 on: December 05, 2012, 23:36:00 pm » |
|
yeah...i d like to go that route too some time, but a bit too expensive for my wallet in the past i dreamed of hillborn TB's for the old look good luck with your project! |
|
|
|
|
Logged
|
|
|
|
|
andy198712
|
|
« Reply #27 on: December 06, 2012, 00:14:12 am » |
|
yeah...i d like to go that route too some time, but a bit too expensive for my wallet in the past i dreamed of hillborn TB's for the old look good luck with your project! cheers bud, i can get a long block for £49.... then cut the jackets off my self.... have friends re position the studs.... decide on what i'll do lifters wise... am i missing anything else? i know bearings are a bit tricky, and you need spacers to fit T1 barrels ect.... hoping it wont be too bad price wise, or am i mistaken? as i do hear they are costly to do! i dont have much budget thus doing most my self.... |
|
|
|
|
Logged
|
|
|
|
|
andy198712
|
|
« Reply #28 on: December 06, 2012, 17:22:06 pm » |
|
 the reason this is sat outside.......... i'm about to fire abrasive grit at a rather expensive piece........ pants? brown. it went ok, currently pre baking it at 170 degrees to drive out any oil left in there after the acetone bath. i hadnt thought about it as i didnt think it would fit in my little oven i brought for this task..... but it does  |
|
|
|
|
Logged
|
|
|
|
|
andy198712
|
|
« Reply #29 on: December 07, 2012, 23:35:55 pm » |
|
blasted, acetoned, and blasted with the air line..... 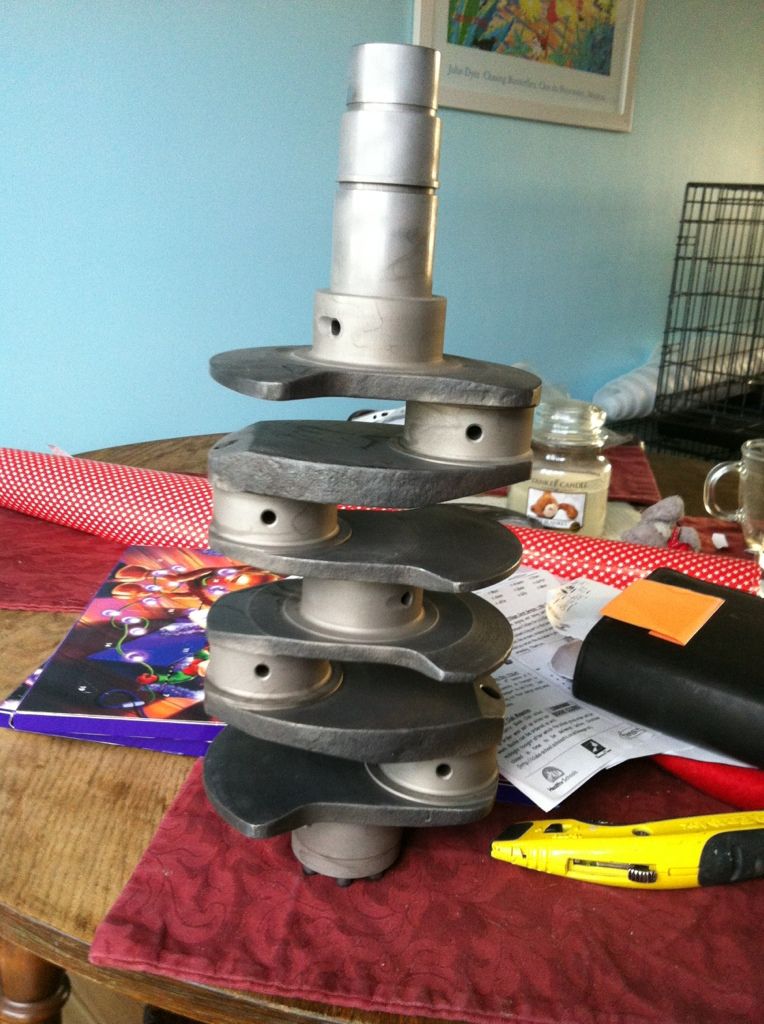 then acetoned again, warmed, sprayed, baked 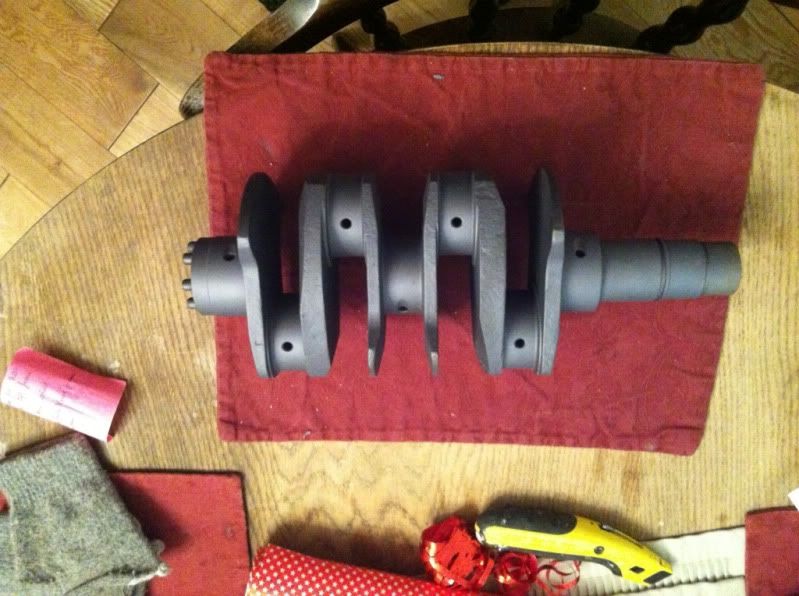 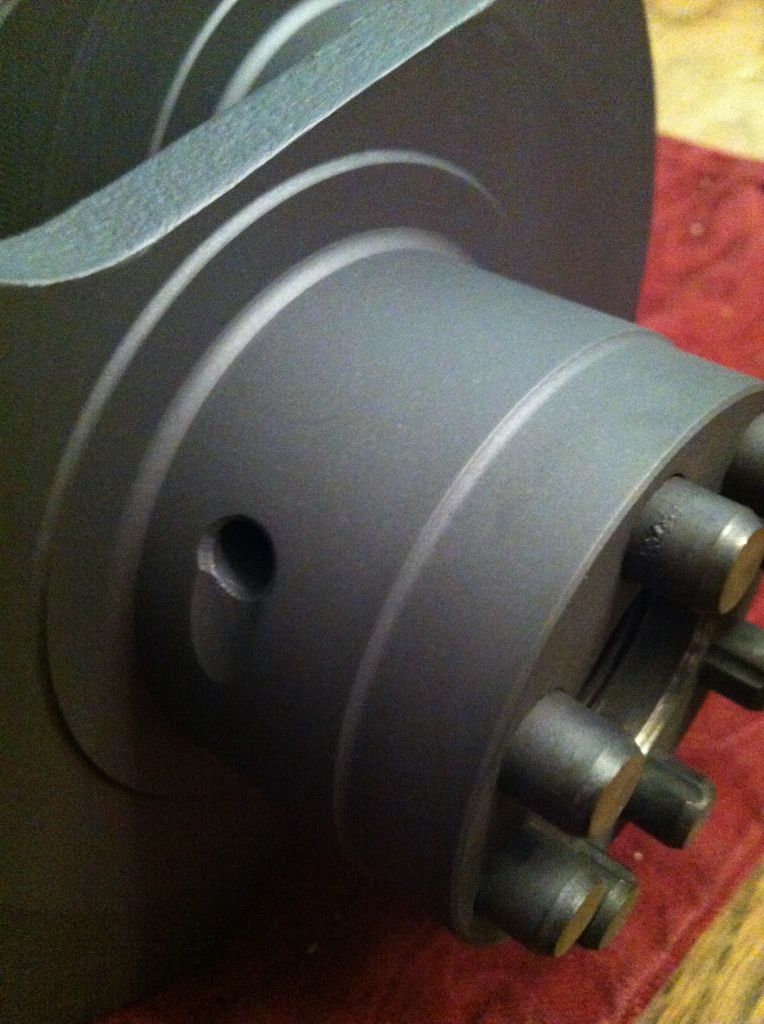 will burnish with scotbrite and oil it up...... pleased with how it came out! |
|
|
|
|
Logged
|
|
|
|
|
 The Cal-look Lounge


 Author