|
Felix/DFL
|
 |
« Reply #30 on: March 17, 2009, 12:59:21 pm » |
|
Hi Jan,
nice progress. Why did you notch your rods? I have seen this trick on the flange main bearing notched by gene berg to get more oil-flow on the thrust side..
Very interisting...
Greetz,Felix
|
|
|
|
|
 Logged
|
|
|
|
|
181
|
|
« Reply #31 on: March 17, 2009, 14:22:44 pm » |
|
Well this process was recommended in one of VW factory service bulletins and was recommended for application when rebulding a Type 4 engines. Its purpose is cooling the underside of pistons by splashing oil on them and I believe that a Type 1 engine can also benefit from this mod. Also, with notched rod, you can run tighter side clearances (not my case I have 0.3mm on each rod).
|
|
|
|
« Last Edit: March 17, 2009, 15:18:19 pm by 181 »
|
Logged
|
|
|
|
|
181
|
|
« Reply #32 on: March 17, 2009, 17:03:56 pm » |
|
this is one topic I started on other forum focused on rod notching |
|
|
|
|
Logged
|
|
|
|
|
Felix/DFL
|
|
« Reply #33 on: March 18, 2009, 07:54:05 am » |
|
Thanks`s very much for the good info. That`s a very cool mod and it makes asolutly sense to me. Did you nocth your rods on both sides? Always nice to see that some motors are not only thrown together without the important detailing... So I will notch my rods for my notch  |
|
|
|
|
Logged
|
|
|
|
|
181
|
|
« Reply #34 on: March 18, 2009, 08:22:46 am » |
|
yes, the rod is notched on both sides and no I can not afford to make mistakes  |
|
|
|
« Last Edit: March 18, 2009, 08:32:45 am by 181 »
|
Logged
|
|
|
|
|
airstuff
|
|
« Reply #35 on: March 18, 2009, 10:11:39 am » |
|
interesting Jan,I am also planning my 2276cc buily in my room  Hey,did you get your heads? |
|
|
|
|
Logged
|
|
|
|
|
181
|
|
« Reply #36 on: March 18, 2009, 11:09:15 am » |
|
Not yet but I´m in contact with Greg. Greg has a broken arm right now so I´m not sure how it will work out But I contacted him to check and if needed to sort out uniformity of valve stem height, I realyy don´t want to tear into their work :-) And how is your progress Zvonimir? |
|
|
|
« Last Edit: March 18, 2009, 11:11:38 am by 181 »
|
Logged
|
|
|
|
|
Rennsurfer
|
|
« Reply #37 on: March 18, 2009, 14:00:50 pm » |
|
Great pics and everything looks normal. Except, why so many clocks? You could set them to the different International time zones, however.
Good luck on your engine, 181. Sounds like it's going to be very nice. and potent.
|
|
|
|
|
Logged
|
"You can only scramble an egg so many ways."
~Sarge
|
|
|
|
181
|
|
« Reply #38 on: March 18, 2009, 15:02:00 pm » |
|
thanks for the heads up These are traditional kitchen clock from 50-60s, I plan to set them to various time zones for sure. Los Angeles..Tokyo..always useful to know.. This is my first "oh sh*t!" situation: 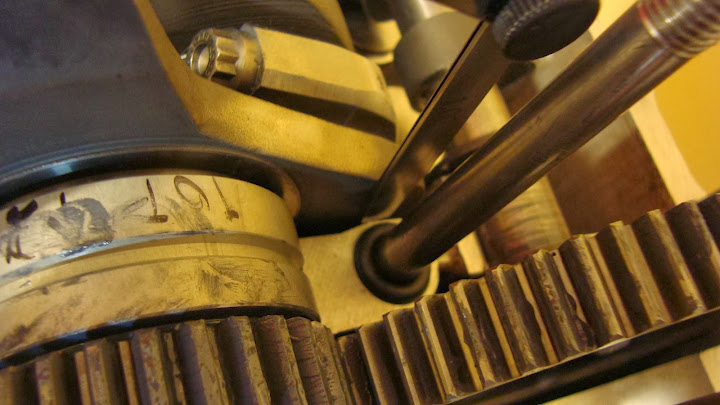 clearance between counterweight and case is around 0.05" measured with feeler gauge. Not much and part of it will go away when I set the endplay. Unfortunately The crank is already balanced and there´s not much meat to take away from the case.. |
|
|
|
« Last Edit: March 18, 2009, 15:16:37 pm by 181 »
|
Logged
|
|
|
|
|
Jim Ratto
|
|
« Reply #39 on: March 18, 2009, 16:53:20 pm » |
|
neat mod to rods. I notch # 1 main on thrust surface on every one that goes out of my garage, cam thrusts too. Never done the rods like that. Berg said it was a way to run tight side clearances on rods (to keep pin bushing in line) but still keep oil flowing across rod bearing. I've run into c/w getting close to case saddles even on 69mm... just use a flap sander and buff until you have .040" (with crank in set endplay position). I built a motor in my living room in an A frame I was renting in Quincy CA. Funny.... timing gear on the stove, crank in the freezer, and kitchen table full of Loctite and Elring K2 tubes and piles of parts. Girlfriend wasn't happy. Too bad.  |
|
|
|
|
Logged
|
|
|
|
|
181
|
|
« Reply #40 on: March 18, 2009, 17:03:56 pm » |
|
Jim, how much to you notch the thrusts on cam?
|
|
|
|
|
Logged
|
|
|
|
|
Jim Ratto
|
|
« Reply #41 on: March 18, 2009, 17:16:23 pm » |
|
I will post a pic later. I would say they are .020" deep if that. I use a 3 corner fine jewel file, then polish for end clearance with 400 wet dry
|
|
|
|
|
Logged
|
|
|
|
|
airstuff
|
|
« Reply #42 on: March 23, 2009, 09:47:03 am » |
|
Not yet but I´m in contact with Greg. Greg has a broken arm right now so I´m not sure how it will work out But I contacted him to check and if needed to sort out uniformity of valve stem height, I realyy don´t want to tear into their work :-) And how is your progress Zvonimir? Waiting for my sump,bearings and few other things to arrive.Not doing much really,lack of time  |
|
|
|
|
Logged
|
|
|
|
|
181
|
|
« Reply #43 on: April 02, 2009, 08:45:03 am » |
|
new pics breather tower: 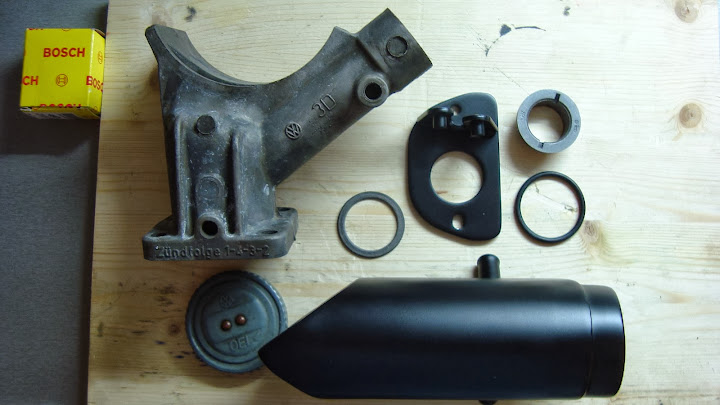 long bolt, securing washer and Loctite for securing the oil suction tube and deep sump:  crankcase block off:  |
|
|
|
|
Logged
|
|
|
|
|
Jesse/DVK
|
|
« Reply #44 on: April 02, 2009, 09:25:45 am » |
|
Nice! I like the crankcase block off!. What kind of breather tower is that?
|
|
|
|
|
Logged
|
Der Vollgas Kreuzers
|
|
|
|
181
|
|
« Reply #45 on: April 02, 2009, 10:56:55 am » |
|
The blockoff is simply a stock blockoff from a new hardware kit which I painted with hi-temp, I removed the studs in the case and used M8 bolts instead.
That is the Latest Rage breather tower, beadblasted and painted, with old style oil cap. Very nice breather tower for 30 bucks and a little work...
|
|
|
|
|
Logged
|
|
|
|
|
Diederick/DVK
|
|
« Reply #46 on: April 02, 2009, 12:42:59 pm » |
|
very nice breather tower dude! never noticed it, gotta have one sorry |
|
|
|
« Last Edit: April 02, 2009, 12:44:45 pm by 67-indeed/DVK »
|
Logged
|
Diederick
-
Proud member of:
DVK ~ Der Vollgas Kreuzers
|
|
|
|
181
|
|
« Reply #47 on: April 02, 2009, 13:11:40 pm » |
|
just go for it you wont be disappointed and it cost only a fraction of what "big names" breathers cost..
|
|
|
|
|
Logged
|
|
|
|
|
richie
|
|
« Reply #48 on: April 02, 2009, 20:37:53 pm » |
|
proberly a bit late at this stage,but check that pulley is nice and tight on th crank,also I put the woodruff keys in the freezer for a night or so,they are real tight,the top one nearest the pulley usually fits easier as the crank is hot from the gears going on when I fit it,all looks good,hope it goes together ok  cheers richie |
|
|
|
|
Logged
|
Cars are supposed to be driven, not just talked about!!! Good parts might be expensive but good advice is priceless |
|
|
|
Diederick/DVK
|
|
« Reply #49 on: April 02, 2009, 20:55:38 pm » |
|
so, what to do if the pulley is not tight on the crank? i guess i once had a major oil leak there when i could slide a cheap pulley in easily? makes for a nice oil fountain in the engine bay |
|
|
|
|
Logged
|
Diederick
-
Proud member of:
DVK ~ Der Vollgas Kreuzers
|
|
|
|
Diederick/DVK
|
|
« Reply #50 on: April 02, 2009, 20:58:04 pm » |
|
just go for it you wont be disappointed and it cost only a fraction of what "big names" breathers cost..
just found out it won't clear my tayco IDA linkage...  |
|
|
|
|
Logged
|
Diederick
-
Proud member of:
DVK ~ Der Vollgas Kreuzers
|
|
|
|
richie
|
|
« Reply #51 on: April 02, 2009, 22:42:37 pm » |
|
so, what to do if the pulley is not tight on the crank? i guess i once had a major oil leak there when i could slide a cheap pulley in easily? makes for a nice oil fountain in the engine bay throw it in the junk pile and buy one that fits tight  , I have seen the heavy pulleys come off from not fitting tight enough,with a regular weight aluminium one its not so critical but must still need to be pulled on or heated to fit onto the crank cheers richie |
|
|
|
|
Logged
|
Cars are supposed to be driven, not just talked about!!! Good parts might be expensive but good advice is priceless |
|
|
|
Diederick/DVK
|
|
« Reply #52 on: April 02, 2009, 22:50:56 pm » |
|
the one i had on my previous was loose.
my current pulley for the next engine should be pretty tight. will check this weekend.
|
|
|
|
|
Logged
|
Diederick
-
Proud member of:
DVK ~ Der Vollgas Kreuzers
|
|
|
|
181
|
|
« Reply #53 on: April 03, 2009, 09:07:17 am » |
|
Thanks Richie, I installed the pulley on the crank for trial fit and also for balancing, the fit is tight so I had to use a puller to take it off. Anyway I´ll use a large beleville washer from JayCee and longer pulley bolt with Loctite threadlocker.
|
|
|
|
|
Logged
|
|
|
|
|
181
|
|
« Reply #54 on: April 03, 2009, 09:11:15 am » |
|
just go for it you wont be disappointed and it cost only a fraction of what "big names" breathers cost..
just found out it won't clear my tayco IDA linkage... I´ll be sporting CSP steel linkage so no prob here :-) |
|
|
|
|
Logged
|
|
|
|
|
richie
|
|
« Reply #55 on: April 03, 2009, 11:15:17 am » |
|
Thanks Richie, I installed the pulley on the crank for trial fit and also for balancing, the fit is tight so I had to use a puller to take it off. Anyway I´ll use a large beleville washer from JayCee and longer pulley bolt with Loctite threadlocker.
that sounds good :)always a pain to get off cheers richie |
|
|
|
|
Logged
|
Cars are supposed to be driven, not just talked about!!! Good parts might be expensive but good advice is priceless |
|
|
|
181
|
|
« Reply #56 on: April 17, 2009, 23:41:07 pm » |
|
So, some small progress made today. I closed the shortblock and no, I didn´t forgot cam plug and right half lifters:-) I mated the halves using Hylomar Aerograde, blue stuff which never completely dries. I can remove the excessive Hylomar on the engine case using sharp knife. I cleaned all with compressed ait before assembly and after tightening the case bolts everything turns freely and smoothly. I threw away Scat delivered hoseclamp extension (a joke) and my own from brass pressed on and Loctited: 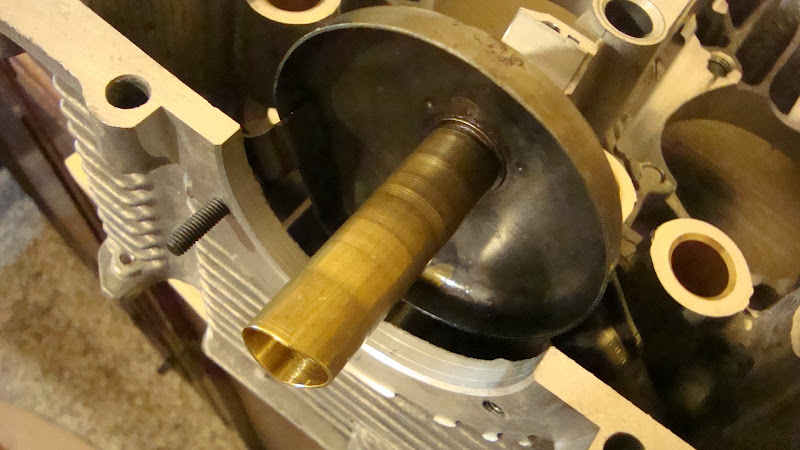 cam grease: 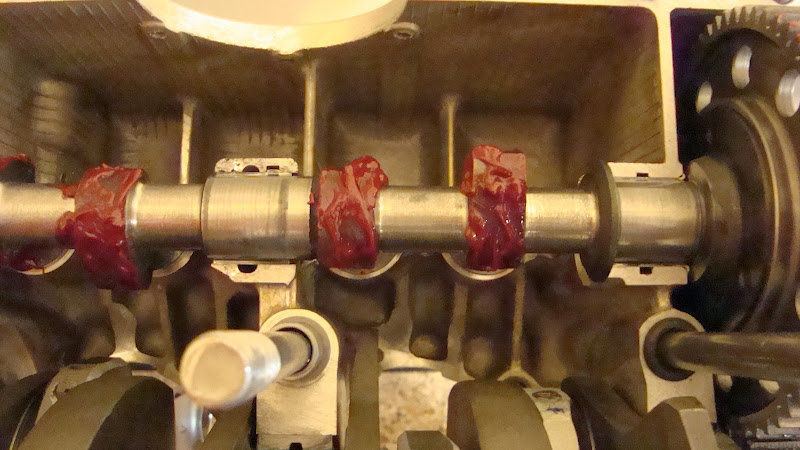 shortblock assembled, 010 with 6500 rpm limiter because I´m young and stupid   |
|
|
|
« Last Edit: April 18, 2009, 00:26:57 am by 181 »
|
Logged
|
|
|
|
|
SlingShot
|
|
« Reply #57 on: April 18, 2009, 00:02:55 am » |
|
Your Engine is looking good.  Do you two ever have romantic dinners over wine and candle light ? If not, you should |
|
|
|
|
Logged
|
Will Race For Beer !!!
|
|
|
|
181
|
|
« Reply #58 on: April 18, 2009, 23:43:08 pm » |
|
Now I have a real world question. Today I finally mocked up the shortblock with cylinders and came up with zero deck height.
I will use my Steve Tims Stage 2 heads with 57cc chamber and 0.35 step in the head.
I know that I have to keep 0.040 abolute minimum distance between piston top and closest place in the head, so I have to use 0.040 copper head gasket. That puts my compression ratio to 9.9:1 and my deck height to 0.075, because my piston top will be 0.040+0.035 from the quench area in the head. That´s already not ideal.
If I would like a lower compression and I use a 0.060 copper head gasket that puts my CR to 9.4:1 and my deck height to unhealthy 0.095.
I think that everything under 10:1 CR is fine with my Engle FK8.
What would you recommend? Thanks, Jan
|
|
|
|
« Last Edit: April 18, 2009, 23:57:00 pm by 181 »
|
Logged
|
|
|
|
|
richie
|
|
« Reply #59 on: April 19, 2009, 12:05:17 pm » |
|
Now I have a real world question. Today I finally mocked up the shortblock with cylinders and came up with zero deck height.
I will use my Steve Tims Stage 2 heads with 57cc chamber and 0.35 step in the head.
I know that I have to keep 0.040 abolute minimum distance between piston top and closest place in the head, so I have to use 0.040 copper head gasket. That puts my compression ratio to 9.9:1 and my deck height to 0.075, because my piston top will be 0.040+0.035 from the quench area in the head. That´s already not ideal.
If I would like a lower compression and I use a 0.060 copper head gasket that puts my CR to 9.4:1 and my deck height to unhealthy 0.095.
I think that everything under 10:1 CR is fine with my Engle FK8.
What would you recommend? Thanks, Jan
what octane fuel can you get? will use? 9.9/1 with good pump gas and VW casting heads will be fine,I have run 10.3/1 with regular shell optimax without any detination problems cheers richie |
|
|
|
|
Logged
|
Cars are supposed to be driven, not just talked about!!! Good parts might be expensive but good advice is priceless |
|
|
|
 The Cal-look Lounge


 Author